

Let's be honest, a custom stubby holder is more than just a way to keep a drink frosty. It’s a powerful, hand-held billboard for your brand, and this guide is for Aussie businesses ready to turn this iconic item into a serious marketing asset.
Your Guide to Creating the Perfect Stubby Holder
We're going to move beyond just picking a colour and slapping a logo on it. This is about making smart choices that actually amplify your brand’s message and turn a simple giveaway into a genuine marketing tool. We’ll cover everything you need to know, from materials and printing to artwork and getting a real return on your investment.
By the end, you'll have a clear roadmap for creating stubby holders that people genuinely love to use—and that keep your brand front and centre. A great stubby holder design should feel like a natural part of your overall strategy for building an online brand.
The stubby holder has deep Aussie roots. It was invented back in 1974 by a savvy NSW publican who wanted to solve the age-old problem of warm hands heating up cold beers. Today, its popularity is stronger than ever. In fact, the Australian promotional products sector—where the custom stubby holder is a true star—is valued at over $1.4 billion annually. You can read more about the history and impact of customised stubby holders.
Here’s what we’ll dive into:
- Materials and Styles: How to choose options that reflect your brand’s quality.
- Printing Methods: The best ways to make your logo and design truly pop.
- Artwork Preparation: The secrets to ensuring a flawless, professional finish every single time.
- Strategic Use-Cases: How to turn your stubby holders into marketing powerhouses.
Choosing Materials That Reflect Your Brand's Quality
The moment someone grabs one of your custom stubby holders, they’re making an instant judgement about your brand. The material isn't just about function; it's a powerful statement about your quality and attention to detail.
Think of it this way: a flimsy business card sends a very different message than one printed on thick, premium cardstock. Your stubby holder works exactly the same way. Getting the material right ensures it feels substantial and valuable, not like a cheap, throwaway novelty.
Premium Neoprene: The Gold Standard
When you picture a classic, high-quality stubby holder, you're almost certainly thinking of neoprene. This is the very same durable, flexible material used in wetsuits, and for good reason. Its dense, rubbery texture provides fantastic insulation, keeping drinks colder for longer—which is, after all, the whole point.
Better yet, neoprene’s smooth surface is the perfect canvas for vibrant, detailed printing. Whether you opt for a full-colour photo finish or a crisp screen print, your logo will look sharp and professional. It just feels good in the hand, communicating durability and a premium quality that reflects well on you.
Budget-Friendly Foam: A Practical Choice for Big Events
On the other hand, if you're planning a massive giveaway for a festival, a direct mail campaign, or any event where the budget is tight, high-density foam is a brilliant choice. Often called "scuba foam," it's more lightweight than neoprene but still offers decent insulation.
Where it really shines is its cost-effectiveness on high-volume orders. Foam is the practical workhorse when you need to get your brand into as many hands as possible without breaking the bank.
We've seen firsthand how the physical feel of a promotional product can directly impact brand perception. In fact, studies on consumer behaviour often place material quality in the top three factors influencing a purchase, right alongside price and the product itself.
This decision tree can help you visualise how your primary goal should guide your choice.
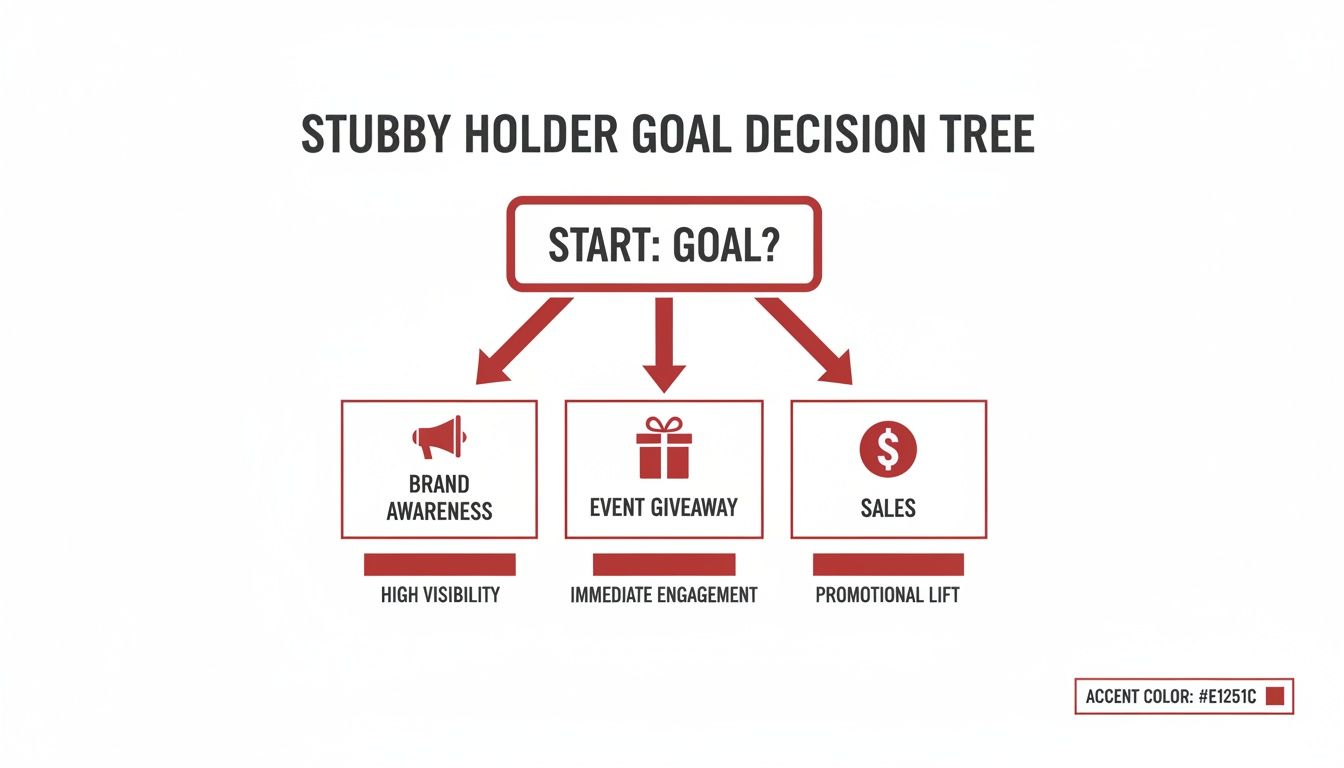
Ultimately, premium materials like neoprene are often better for building brand loyalty with key clients, while more economical options like foam are perfect for broad-stroke awareness campaigns.
Comparing Stubby Holder Materials and Styles
To make the decision even easier, here’s a quick breakdown of the most common materials and styles. This table outlines the key features and ideal scenarios for each, helping you match the perfect stubby holder to your specific promotional needs.
| Material/Style | Key Features | Best For | Insulation Level |
|---|---|---|---|
| Neoprene | Premium feel, durable, flexible, excellent insulation, superior print quality. | Corporate gifts, premium brands, merchandise sales, building brand loyalty. | High |
| Foam | Lightweight, highly cost-effective for large orders, good insulation. | Mass giveaways, trade shows, festivals, budget-conscious campaigns. | Medium |
| Flat-Pack | Folds completely flat, taped seam, glued base, great for mail-outs. | Direct mail campaigns, magazine inserts, easy transport and storage. | Varies by material |
| Stitched Base | Sturdy overlocked seam, won't tip easily, perceived as higher quality. | Bar merchandise, corporate events, long-term use where stability matters. | Varies by material |
As you can see, the "best" option truly depends on what you're trying to achieve—from mailing a thousand units to gifting a few dozen premium items.
Construction Styles: Flat-Pack vs. Stitched Base
Beyond the raw material, the way your stubby holder is put together also makes a big difference to its function and appeal.
-
Flat-Pack (Tape Seam): These are the most popular and cost-effective designs. They're made from a single piece of material with a taped seam and a glued-on base. Their biggest advantage? They fold completely flat, making them perfect for posting, slipping into gift bags, or storing without taking up much space.
-
Stitched Base (Overlocked Seam): For a more traditional, robust feel, look at holders with an overlocked, stitched seam and an integrated base. This construction is far more stable, so it's less likely to tip over on a table. The visible stitching also adds a touch of craftsmanship that many people associate with higher quality.
Both styles are great, but the right one depends on your distribution plan and what you want the user experience to be. And if sustainability is a key part of your brand's message, it's worth exploring our range of eco-friendly promotional products, which includes options made from recycled materials.
At the end of the day, picking the right material and style is about making sure the physical product aligns with your brand's identity. A premium neoprene holder with a stitched base is a fantastic corporate gift, while a lightweight, flat-pack foam holder is the perfect choice for a fun, high-energy festival.
Bringing Your Brand to Life with the Right Printing Method
Your design is only as good as the printing technique used to bring it to life. Think of it like this: choosing the right method is like picking the perfect frame for a piece of art. It doesn't just hold it; it elevates it, making sure your brand’s message comes across loud, clear, and professional. This single choice affects everything from the pop of your colours to how long the design will last.
Let's say you've put in the hours to get your logo just right. Slapping it onto a stubby holder with a cheap, subpar printing method is like recording a hit song with a dodgy microphone—the quality just won't do your hard work justice. So, let’s walk through the main options to make sure your branding is sharp, vibrant, and built to last.
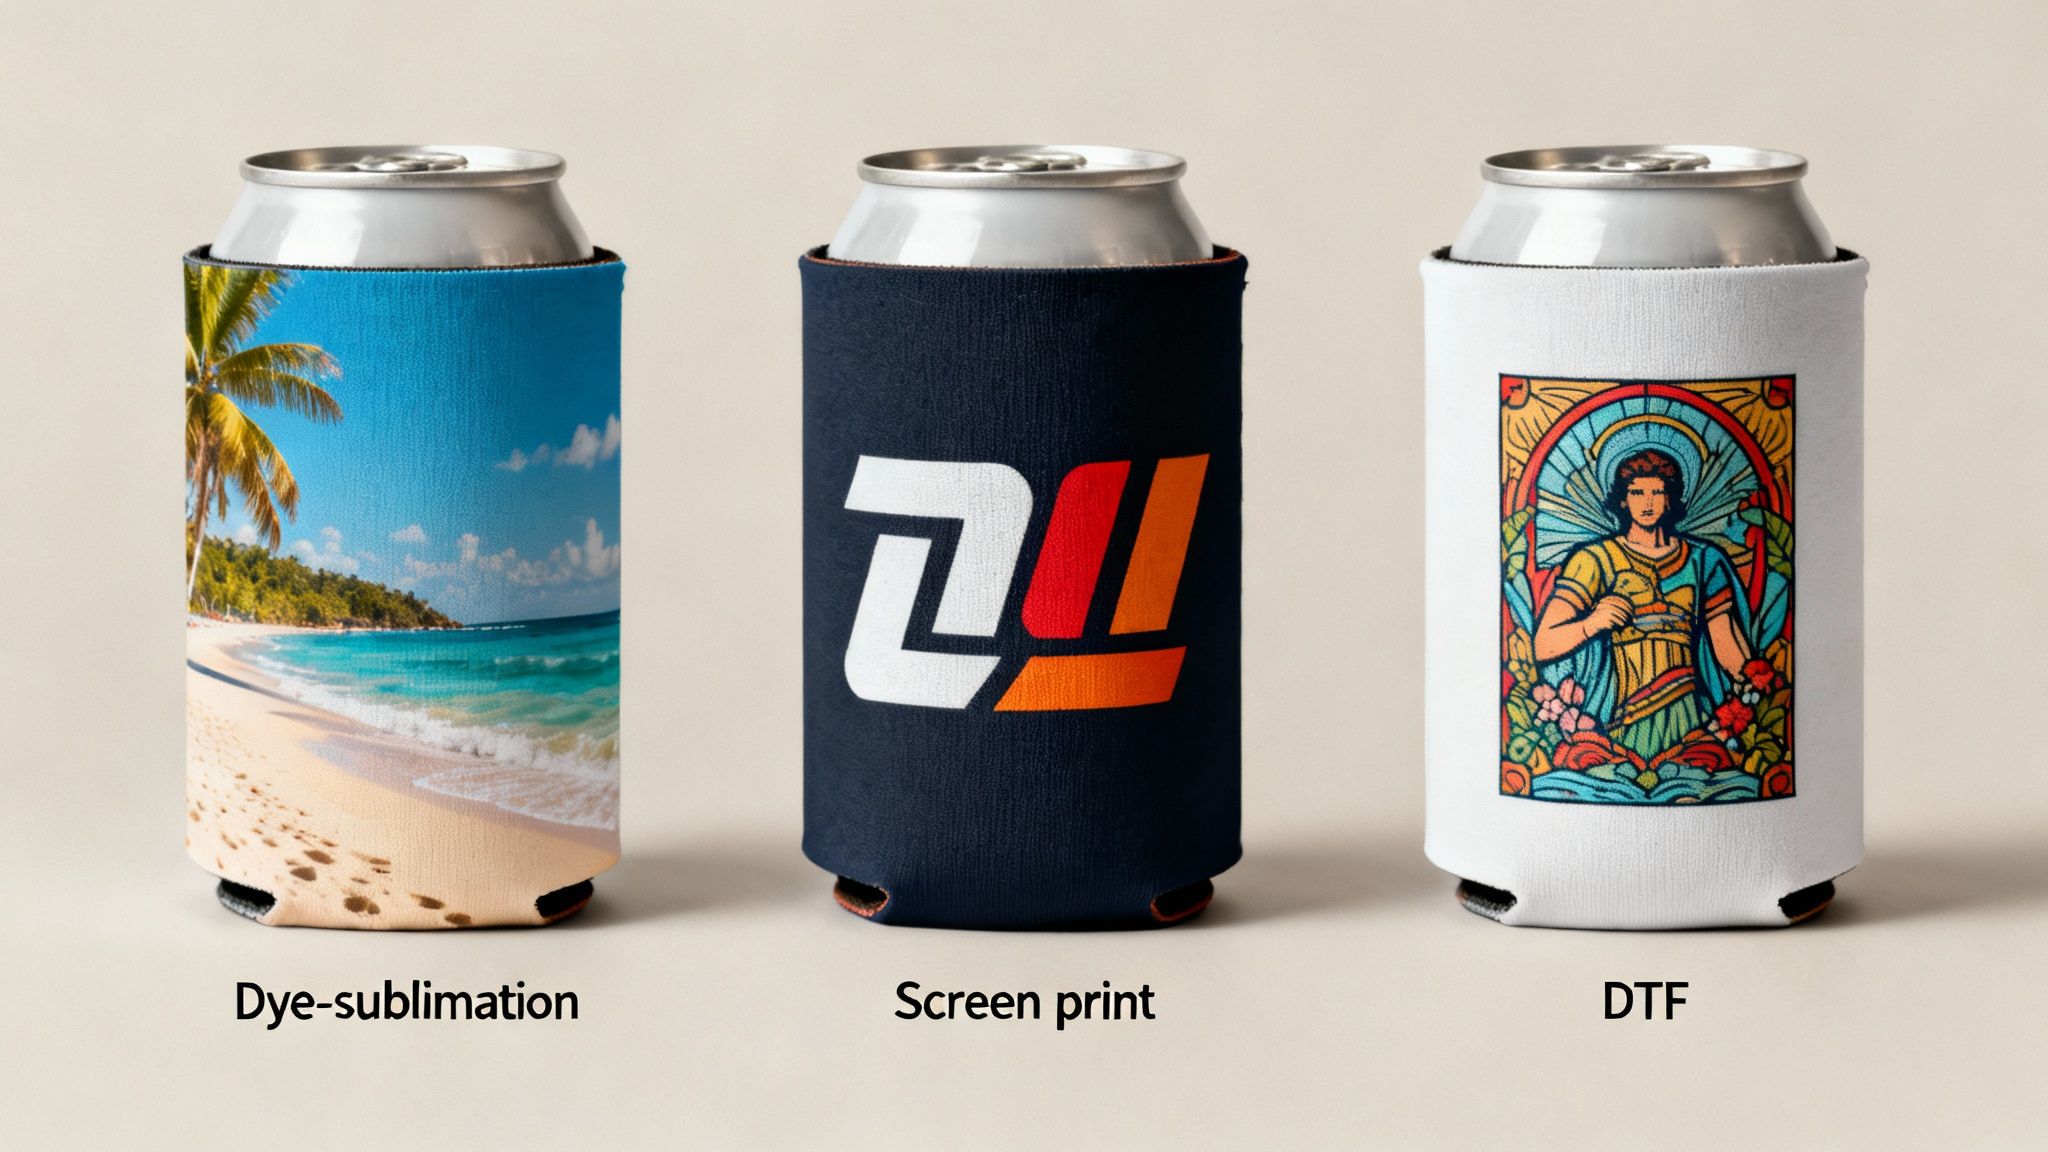
Vibrant and Flawless Dye-Sublimation
When you’re working with photographic images, complex colour gradients, or a design that needs to wrap around the entire stubby holder, dye-sublimation is the undisputed champion. It’s a fascinating process that’s less like printing on the material and more like infusing the ink directly into it.
Basically, special heat-sensitive inks are turned into a gas that permeates the neoprene fabric. As it cools, the ink solidifies and becomes a permanent part of the material itself. This leaves you with a stunning, full-colour finish that has zero texture. You literally can't feel the print at all.
So, what does that mean for your brand?
- No cracking or peeling: The ink is embedded in the fabric, so your design will last as long as the stubby holder does. Simple as that.
- Photographic quality: It’s the best way to reproduce high-resolution images and tiny details with breathtaking clarity.
- Edge-to-edge coverage: This method allows for "full bleed" designs that wrap seamlessly around the entire product with no awkward gaps.
For a premium, visually stunning stubby holder that needs to make a serious impression, dye-sublimation is the way to go.
Screen Printing for Bold Simplicity
Now, if your design is simpler—maybe a bold logo with one or two solid colours—then screen printing is a classic and incredibly cost-effective workhorse. It’s a time-tested method where ink is pushed through a mesh screen stencilled with your design, right onto the stubby holder's surface.
Each colour in your design needs its own screen, which is why this method really shines with a limited colour palette. It lays down a thick, durable layer of ink that you can feel, giving the final product a nice, tactile quality. For big orders with straightforward branding, you just can’t beat the value of screen printing.
Modern Direct to Film (DTF) Transfers
Sitting in that sweet spot right in the middle is the modern technique of Direct to Film (DTF) printing. This process involves printing your full-colour design onto a special film, which is then heat-pressed directly onto the stubby holder. It gives you the best of both worlds: the multi-colour freedom of digital printing and the durability of a heat transfer.
DTF allows for the reproduction of intricate, full-colour logos without the high setup costs associated with screen printing for multiple colours. This makes it an exceptionally versatile and cost-effective choice for complex designs on both small and large orders.
To make sure your stubby holders are a true reflection of your business, it’s vital to create strong brand guidelines that keep your look consistent across all marketing efforts. Whether you choose DTF or sublimation, a clear guide ensures your colours and logo are always on point.
It’s the versatility of these methods that makes custom made stubby holders such a powerful promotional item. In fact, bulk pricing can dip as low as $1.20 per unit for 500+ neoprene holders with full-colour DTF printing. That makes them about 70% cheaper than a branded t-shirt, yet 3x more likely to be used every day.
Making the right choice here guarantees your investment turns into a product that looks professional and does your business proud. You can always dive deeper into our custom printing options to see which technique is the perfect match for your next project.
Getting Your Artwork Ready for a Perfect Print
Getting your artwork right from the start is the secret ingredient for stubby holders that look sharp and professional. It’s less about being a design guru and more about a simple pre-flight check. A few quick steps now will save you from headaches and delays later, making sure the design you sign off on is exactly what arrives at your door.
Think of it this way: we need the right blueprint to build the perfect product. Understanding a couple of printing fundamentals helps us ensure your logo stays crisp, the colours pop just right, and nothing important gets chopped off when we make them.
Why We Ask for Vector Files
Ever tried to stretch a small photo to make it bigger, only to have it turn into a blocky, pixelated mess? That’s what happens with common image files like JPEGs, GIFs, and PNGs. They're built from a grid of tiny dots (pixels), and when you enlarge them, you're just making the dots bigger, which kills the quality.
This is exactly why we need your logo and artwork in a vector format. The most popular vector file types are:
- .AI (Adobe Illustrator)
- .EPS (Encapsulated PostScript)
- .PDF (when saved properly from a vector program like Illustrator)
Instead of pixels, vector graphics use mathematical paths and points. This clever setup means they can be scaled up or down to any size—from a tiny icon on a business card to a massive billboard—and they will always stay perfectly sharp and clear. It's the only way to guarantee a flawless, high-quality print on your stubby holders.
A Quick Guide to Print Colours: CMYK vs. RGB
The bright, glowing colours you see on your monitor are made with light—a mix of Red, Green, and Blue (RGB). But physical printing uses ink—a mix of Cyan, Magenta, Yellow, and Black (CMYK). They're two completely different ways of creating colour. A super-vibrant green on your screen can sometimes look a bit more muted when printed with ink.
To make sure what you see is what you get, all artwork for printing needs to be set up in CMYK colour mode. This ensures the colours on your digital proof are a true reflection of how they'll look on the finished product. No nasty surprises when you open the box!
One of the most common hiccups is approving a digital proof in RGB. The colours look amazing on screen, but they don't translate directly to ink. Always check that your proof is in CMYK for the most accurate preview of the final result.
Understanding the Print Template Lingo
To ensure no part of your brilliant design gets accidentally trimmed off, it helps to know your way around a print template. There are three key areas to keep in mind.
-
Safe Zone: This is your prime real estate. All the crucial stuff—your logo, phone number, and any text—needs to live comfortably inside this area. Placing it here guarantees it won’t be cut off during the final trimming and stitching.
-
Trim Line: This is the line showing exactly where we'll cut the material. Anything sitting right on this line is in the danger zone and could be partially sliced off.
-
Bleed Area: If you have a background colour or image that you want to run right to the edge, it needs to extend past the trim line into this bleed area. This little bit of overflow acts as a safety margin, so if there's a tiny shift during cutting, you won't get any unwanted white slivers along the edge.
Nailing these simple concepts gives us everything we need for a fantastic print run. For a deeper dive, our guide has some great artwork submission tips for beginners that will have you sending over files like a pro.
How to Turn Stubby Holders into Marketing Powerhouses
Think of a well-designed stubby holder as more than just a giveaway. It's a marketing asset that keeps working for you long after you hand it over. A digital ad flashes on a screen and is gone in seconds, but a custom stubby holder becomes a physical part of your customer's social life, creating lasting impressions for a tiny fraction of the cost.
Let's move past seeing it as a simple freebie and dig into how to turn this classic Aussie item into a real marketing workhorse with a solid return on investment.
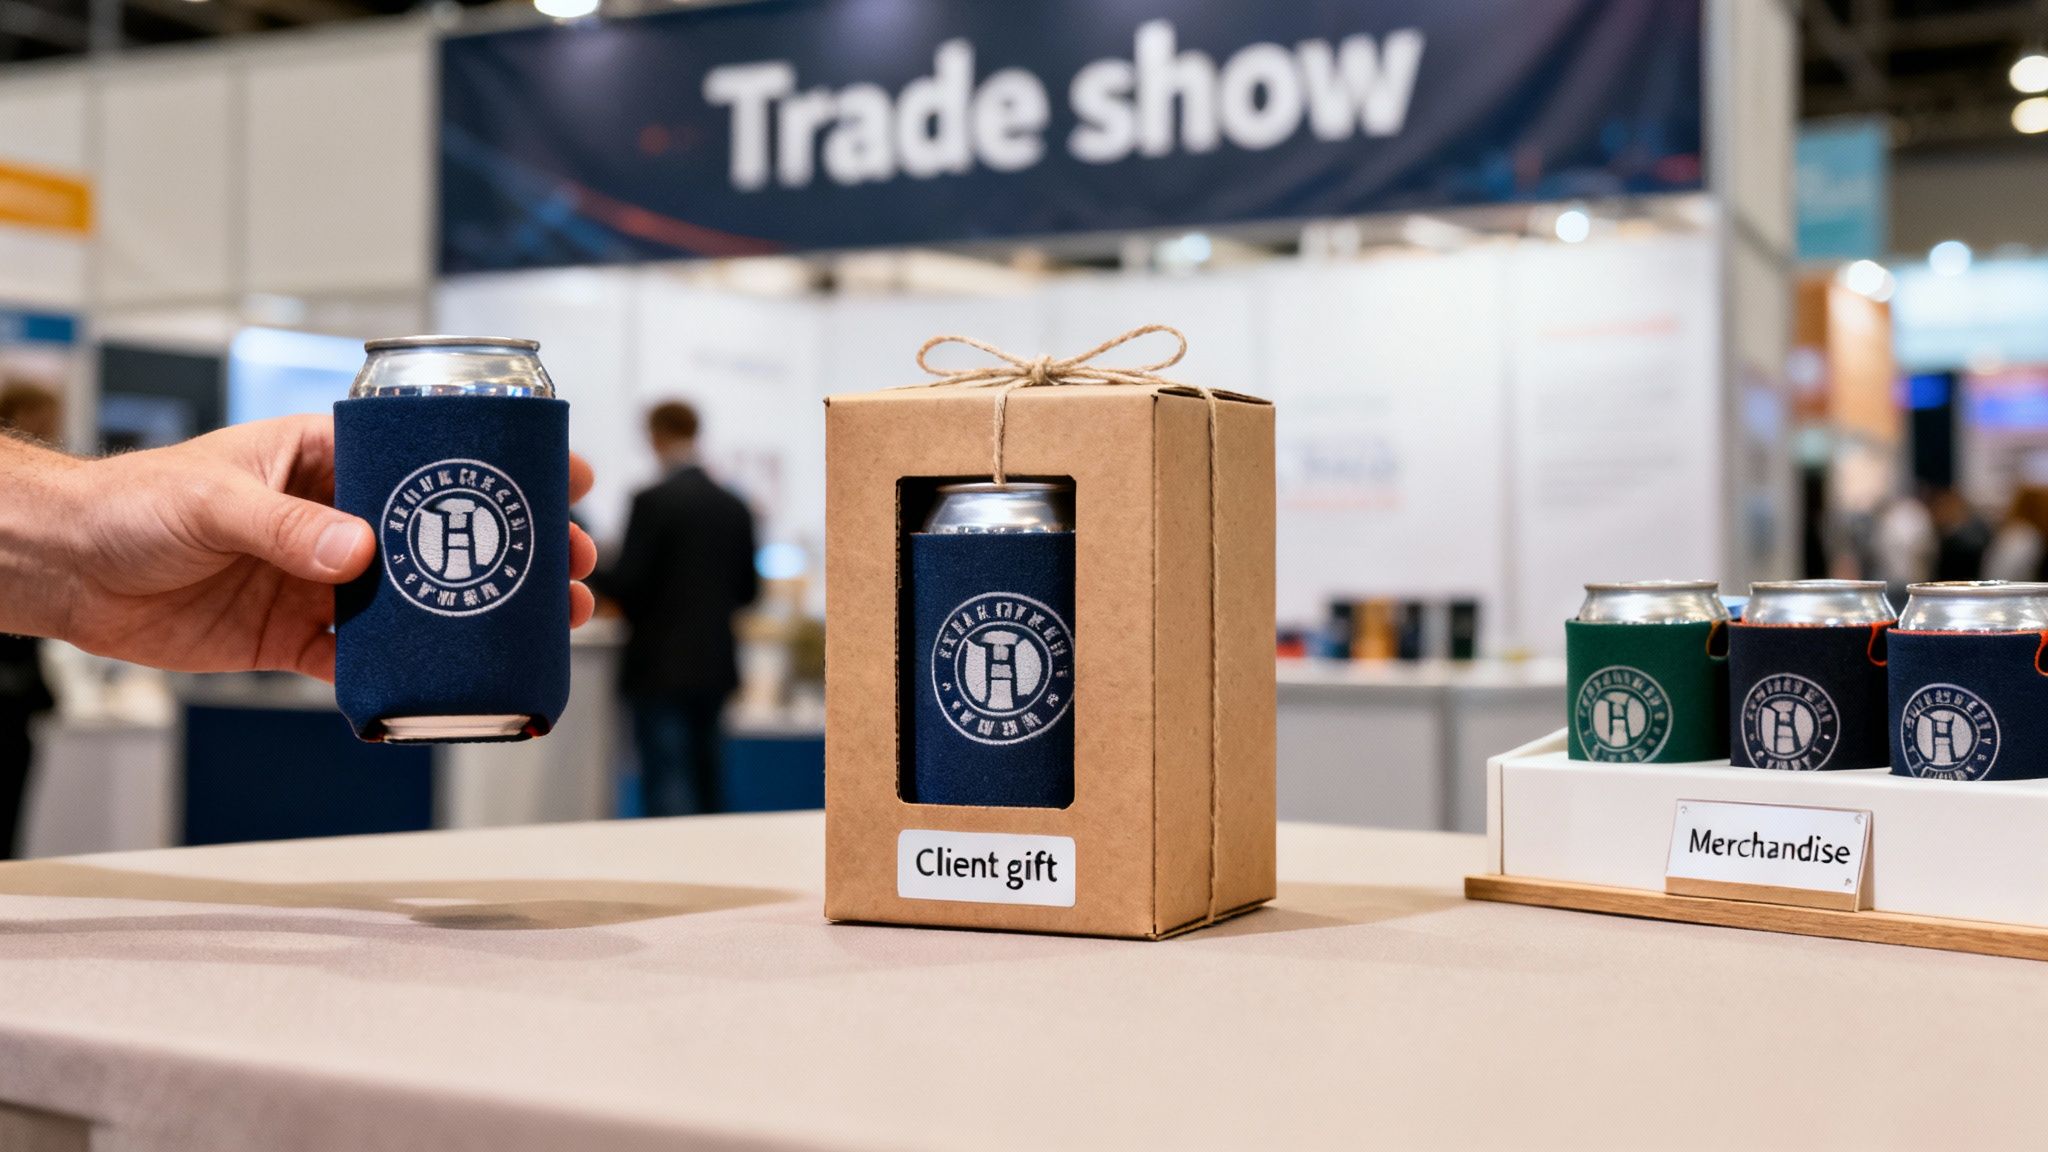
Dominate Trade Shows and Events
At a packed trade show, your number one job is to be memorable. Business cards vanish and brochures often head straight for the bin, but a genuinely useful, quality stubby holder is a different story. It’s a practical item that people will actually keep and use, especially when it's time for networking drinks after the event.
Every time they grab it, they’re not just seeing your logo; they’re remembering the chat they had with your team. This simple bit of merch suddenly becomes a powerful conversation starter and a constant brand advocate.
Strengthen Relationships with Client and Employee Gifting
Building loyalty happens one positive interaction at a time. Slipping a well-designed stubby holder into a client thank-you pack or an employee welcome kit is a small gesture that lands with a big impact. For clients, it's a thoughtful gift that says you value their partnership outside the boardroom.
For new hires, it’s a casual welcome to the company culture, making them feel like one of the crew from day one. It helps build that internal brand pride, which is every bit as crucial as how your customers see you.
A promotional product isn't just about getting your name out there; it's a physical token of a relationship. Research shows that 8 in 10 consumers are more likely to do business with a brand after getting a promo product, proving just how powerful it is for building goodwill and loyalty.
This just goes to show that thoughtful merchandise can be one of the most effective tools you have.
Create New Revenue Streams in Retail and Hospitality
If you're in hospitality or retail—think pubs, breweries, or tourist shops—custom stubby holders are more than just promo gear. They're high-margin retail products. Craft beer drinkers, for example, really connect with their favourite brands and are often keen to buy merchandise that shows off their tastes.
A great-looking stubby holder can easily become a bestseller right there on your counter. Another smart move is using them as a gift-with-purchase. An offer like, "Buy a six-pack and get a free branded stubby holder," is a brilliant way to drive up sales and give customers a lasting reminder of your brand.
Calculating the True Return on Investment
Let’s get down to the numbers. Digital ads have their place, but the cost-per-impression (CPI) can be steep for an interaction that's over in a blink. A stubby holder, on the other hand, is a one-time purchase that can generate impressions for years.
Imagine a stubby holder costs you $2.50 per unit. If someone uses it just once a week for two years, that’s 104 impressions. Suddenly, your cost per impression has dropped to just over two cents. Now, what if they take it to a barbecue with ten friends? That’s ten impressions in one afternoon. The value multiplies fast, delivering a CPI for brand recall that most digital campaigns can only dream of.
By using them strategically, you’re basically creating a small army of mini-billboards that go to work for you at weekend barbies, footy games, and camping trips all over the country. This approach forges a practical, long-lasting connection with your audience. Taking the time to explore the full range of available promotional products can help you build out a complete strategy where every single item works together to amplify your message.
How to Order Your Stubby Holders (Without the Headache)
Ordering custom stubby holders should be one of the fun parts of your marketing plan, not something that keeps you up at night. A good, clear process means you get exactly what you imagined, right when you need it for that big trade show or company event.
Let's walk through the simple roadmap we use to make sure everything goes off without a hitch. It’s a bit like ordering a custom cake – you tell us the flavour and design, we show you a sketch to approve, and then our bakers get to work. No surprises, just a great result.
Getting a Quick, Accurate Quote
First things first, you'll need a quote. To get a price locked in fast and avoid a dozen back-and-forth emails, the trick is to have your details ready from the get-go. A clear brief helps us give you a sharp price and a solid timeline almost straight away.
Before you get in touch, just pull together this info:
- How many you need: Are you after a small batch or a whole truckload?
- The style you want: Thinking premium neoprene or budget-friendly foam? Flat-pack for mail-outs or a classic stitched base?
- Your design: Is it a simple one-colour logo (perfect for a screen print) or a complex, full-colour photo (that’s a job for sublimation)?
- Your deadline: When do you absolutely, positively need them in your hands?
Having these details ready makes everything incredibly smooth for you and for us.
The Digital Mock-Up: Your Most Important Checkpoint
After you’ve given the quote the thumbs-up and sent us your artwork, we hit the most crucial part of the process: the digital mock-up. This is basically a digital preview that shows you exactly how your design will look on the finished stubby holder. It confirms the size, the colours, and the positioning. It’s your last chance to catch any mistakes before we print the whole lot.
Seriously, don't skip this. Approving the digital mock-up is the single best way to make sure the final product is perfect. It removes all the guesswork and protects your budget from a costly mistake.
Treat this proof like a final blueprint. Double-check every single detail—spelling, phone numbers, logo placement—before you give us the green light. Once you say "go," the machines start rolling.
Production and Delivery Timelines
Knowing the timelines is key to planning your campaign. Once you’ve approved that final artwork proof, standard production for most custom stubby holders takes around 10 to 15 business days.
From there, shipping across Australia can add another 2 to 7 business days, depending on if you’re in a major city like Sydney or somewhere more regional. It's really important to factor both of these timeframes into your schedule. If your event is on the 30th, you should be aiming for them to land on your doorstep by the 25th at the latest. That little buffer is a lifesaver.
Why Bulk Orders and Tiered Pricing Are Your Best Friend
Here’s a massive perk of ordering promotional gear: tiered pricing. The concept is dead simple: the more stubby holders you order, the less you pay for each one. Ordering 500 units will give you a much, much better price per item than just ordering 50.
This happens because the biggest costs are in the initial setup—getting the screens ready, calibrating the printers, and prepping the artwork. Once that’s all done, churning out more is super efficient. If you know you'll have a few events coming up, placing one larger order is way more cost-effective than a bunch of small ones.
Not only does this save you a heap of cash, but it also means you’ve always got some killer marketing merch ready to go whenever an opportunity arises. For a step-by-step guide on how it all works, you can follow our simple instructions to order promotional products from Simply Merchandise.
Got Questions About Custom Stubby Holders? We've Got Answers
When you're looking to get custom stubby holders made, it’s natural to have a few questions pop up. Getting the right answers upfront is key to making sure your project runs smoothly, stays on budget, and lands on your doorstep right when you need it.
Let's walk through the most common things businesses ask us, from how many you need to order to what the turnaround time looks like.
What’s the Minimum Number I Can Order?
This is usually the first thing people want to know. For most custom stubby holders, the starting line is typically around 50 to 100 units. This makes them a really accessible option, even if you're a small business or just need them for a targeted corporate gift.
Keep in mind, though, that the price per stubby holder gets much better the more you order. The real cost is in the initial setup, so once that's covered, the price per unit drops. If you're planning for a big trade show, a large-scale marketing campaign, or stocking up on retail merch, ordering 500 or more is where you'll see the best value. It’s always a good idea to chat with your supplier, as some might be able to do a smaller run for a slightly higher cost per item.
How Long Will It Take to Get Them?
Knowing your timeline is crucial for a stress-free launch. As a general rule of thumb, you should plan for about 10 to 15 business days for production once you’ve signed off on the final artwork. This is the time it takes for us to print your design, cut the material, and stitch everything together.
After that, you'll need to factor in shipping. Within Australia, this can take anywhere from 2 to 7 business days, depending on where you are. A delivery to a major city like Melbourne will obviously be quicker than a delivery to a more regional spot. If you’re in a real pinch, always ask about express production options—it might cost a little extra, but it can be a lifesaver.
"A classic mistake is forgetting to add shipping time onto the production time. We always suggest building a little bit of a buffer into your deadline so your stubby holders arrive with plenty of time to spare before your big event."
Can I Get a Sample Before Placing a Big Order?
Absolutely, and we highly recommend it. There’s nothing like seeing and feeling the product in your own hands to know you're getting the quality you expect. Any good supplier will offer you a way to check out the goods before you commit.
Here are the two main ways you can do this:
- A generic sample: We can send you a stubby holder we’ve made for a previous job. This lets you check out the neoprene, feel the quality of the stitching, and see how the print looks in person.
- A digital mock-up: This is a must-do. Before we print anything, you’ll get a digital proof that shows exactly how your design will look on the stubby holder template. This is your chance to give the final thumbs-up on colours, logo placement, and spelling before the whole lot goes to print.
That approval step is so important—it’s how we guarantee the final product is exactly what you had in mind.
Ready to create a custom stubby holder that people will actually want to use? The team at Simply Merchandise is here to guide you through it all, from the first design idea to the final delivery.


