
Access Denied
IMPORTANT! If you’re a store owner, please make sure you have Customer accounts enabled in your Store Admin, as you have customer based locks set up with EasyLockdown app. Enable Customer Accounts

Printed on t shirts: A Practical Guide to Getting T-Shirts in Australia
Posted By Matthew Malios
on
Getting your logo onto a t-shirt seems simple enough, but it’s one of the most powerful moves an Australian business can make. It’s how you build brand recognition, create a sharp-looking team, or produce memorable merch for an event. The whole game is about picking the right printing method, getting your artwork spot-on, and choosing a quality garment to bring it all together.
Your Guide to Creating Branded T-Shirts That Actually Make an Impact
Think of a simple printed t-shirt as one of your best marketing assets. It literally turns your team, your clients, and your fans into walking billboards for your brand. Whether you're gearing up for a big promotional giveaway, kitting out your staff for a trade show, or planning a corporate event, getting the printing right from the start is absolutely crucial.
This guide is here to cut through the noise. We'll walk you through the main printing techniques, breaking down the good and the bad of each one. That way, you can make a smart choice based on what you actually need—your budget, your timeline, and how complex your design is. Nailing this decision upfront saves you headaches, money, and ensures the final product looks just like you imagined.
Why Are Custom T-Shirts Such a Smart Investment?
Putting your logo on a shirt is about more than just fabric and ink; it’s about creating a real, tangible connection with people. The demand for personalised and branded clothing keeps climbing because, frankly, it works.
The numbers back it up, too. The custom t-shirt printing market in Australia is booming, with imports growing at a rate of 11.93% between 2023 and 2024 alone. You can dig deeper into this market growth over on 6wresearch.com.
So, what’s in it for you?
- Brand Visibility on the Move: A custom tee is a moving advertisement, getting your brand seen in places you’d never expect.
- A Polished, Professional Look: Nothing says "we're a team" like matching, branded apparel. It instantly sharpens up your image at events or in your place of business.
- Builds Team Spirit: Wearing the same brand fosters a real sense of belonging and unity among staff. It’s a small thing that makes a big difference to morale.
- Marketing That Doesn't Break the Bank: When you look at the cost versus the lasting promotional value, custom t-shirts offer a fantastic return on investment compared to other advertising channels.
By the time you're done with this guide, you’ll have the confidence and know-how to choose the right printing method and order high-quality apparel that gets results. To see the full scope of what's possible, take a look at our complete range of branded clothing.
Comparing Popular T-Shirt Printing Methods
Choosing how to get your design onto a t-shirt can feel a bit overwhelming at first. Each path leads to a different result in look, feel, durability, and of course, cost. Getting to grips with the main printing methods is the first step to making the right call for your promotional campaign, team uniforms, or event merch.
Let’s put it this way: you wouldn't use a paint roller to touch up a tiny detail on a portrait. T-shirt printing is much the same. Each method is a specific tool, and the trick is picking the right one for the job at hand.
Screen Printing: The Bulk Order Champion
Screen printing is the old-school, tried-and-true workhorse of the t-shirt world. Think of it like a highly detailed stencil, where a separate "screen" is made for each colour in your design. Ink is then pushed through these screens, one colour at a time, directly onto the garment.
The setup is quite involved, which is why it’s not cost-effective for a one-off shirt. But once those screens are ready? The process is lightning-fast and incredibly efficient, making it the undisputed winner for large orders. For a run of 100 shirts with a simple, one-colour logo, screen printing delivers vibrant, long-lasting results at a fantastic per-unit price. The ink sits slightly raised on the fabric, giving it that classic, durable finish we all know.
Direct-To-Garment (DTG): The Detail Specialist
If screen printing uses stencils, then Direct-to-Garment (DTG) printing is like a high-end office printer that’s been built specifically for fabric. A DTG machine sprays water-based inks straight onto the t-shirt, allowing them to soak right into the cotton fibres.
This process is perfect for designs with lots of detail, smooth colour gradients, or a whole spectrum of colours—think a full-colour photograph or a complex piece of art. Because there are no screens to prepare, DTG is brilliant for small batches or even single, one-of-a-kind prints. The result feels incredibly soft because the ink becomes part of the shirt itself, rather than a layer on top.
Dye Sublimation: The All-Over-Print Pro
Dye sublimation is where things get a bit scientific. This method uses special heat-sensitive inks that, when heated, turn into a gas and permanently fuse with polyester fibres. The design doesn't just sit on the t-shirt; it becomes an integral part of the fabric.
This means you literally can't feel the print. It will never crack, peel, or fade. The only catch is that it only works its magic on light-coloured, polyester or poly-blend fabrics. Sublimation is the secret behind those incredible, all-over prints you see on activewear and team sportswear.
Heat Transfer Vinyl (HTV): The Customisation Ace
Heat Transfer Vinyl (HTV) is a straightforward but effective technique. We cut your design from a sheet of coloured vinyl and then use a heat press to bond it securely to the t-shirt. It’s the go-to choice for simple text, numbers, and basic logos.
This is why HTV is the industry standard for personalising team jerseys with names and numbers. While it’s not the best for super-detailed or multi-coloured images, it provides a crisp, bold finish and works on all sorts of fabrics, from cotton to polyester. It’s a versatile and budget-friendly option for small-scale custom jobs.
To make sense of these options for your project, this decision-making guide can help you narrow it down quickly.
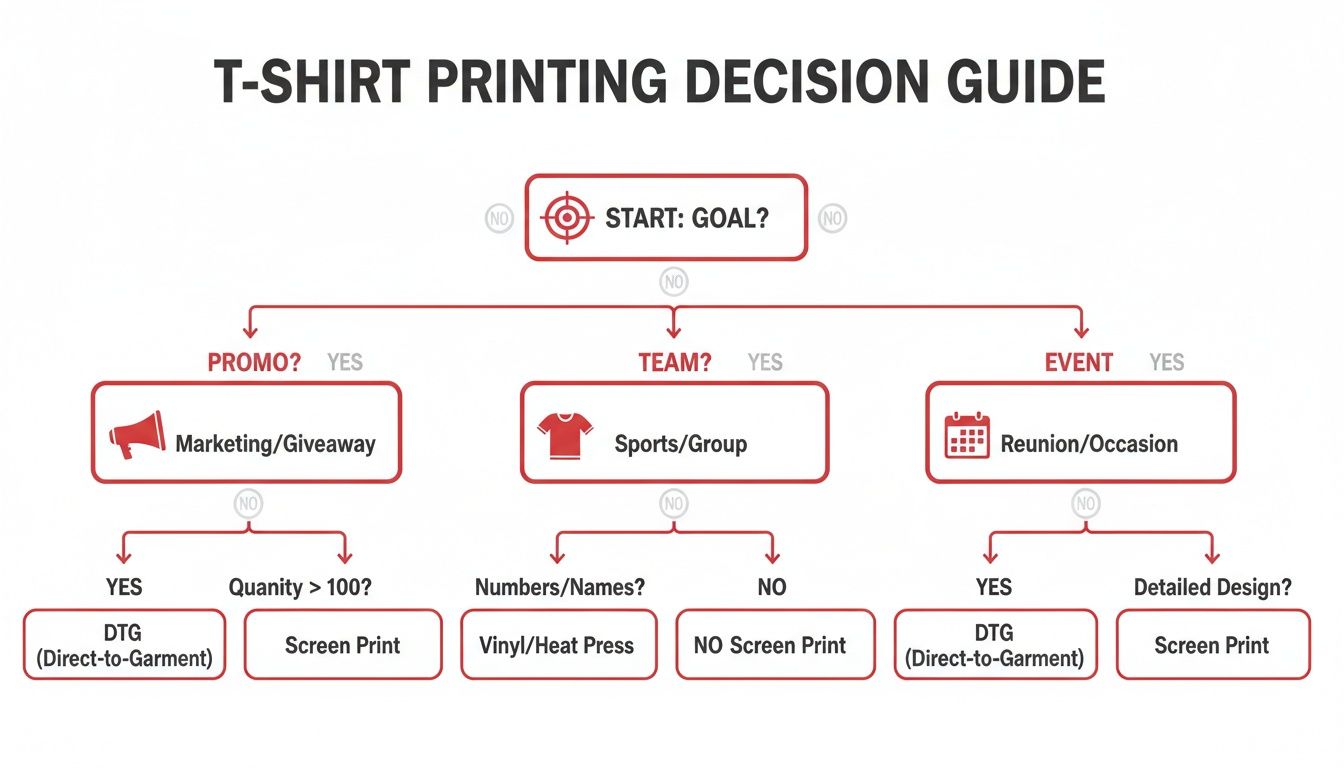
As the flowchart shows, the best method really depends on your main goal, whether it’s a massive promotional giveaway or a small batch of custom team gear.
T-Shirt Printing Method Comparison
To help you see everything side-by-side, here’s a quick comparison of the main printing methods based on the factors that matter most to businesses.
| Printing Method | Best For | Feel on Fabric | Durability | Cost at Low Volume | Cost at High Volume |
|---|---|---|---|---|---|
| Screen Printing | Simple designs (1-4 colours) in large quantities (50+) | Slightly raised, thick layer of ink | Excellent, very long-lasting | High | Very Low |
| DTG | Complex, multi-colour designs, photos, and small orders | Very soft, ink soaks into fabric | Good, can fade slightly over time | Low | Moderate |
| Dye Sublimation | All-over prints on light-coloured polyester garments | Completely undetectable, part of the fabric | Excellent, will not crack, peel, or fade | Moderate | Moderate |
| Heat Transfer | Names, numbers, simple logos, and small custom orders | Smooth plastic-like layer on top of fabric | Good, but can crack over time with improper care | Low | High |
Ultimately, picking the right method comes down to balancing four key things: the complexity of your design, your order quantity, the t-shirt fabric, and your budget. Nail that balance, and you're set for a successful project.
The demand for great custom apparel is undeniable. In fact, Australia's t-shirt market grew to an impressive $889 million in 2024, a jump of 9.7% from the previous year. This shows just how vital branded t-shirts have become for businesses.
Of course, printing isn't the only way to go. Embroidery offers a premium, textured look that’s perfect for logos on polos and corporate uniforms. If you’re curious about high-end embellishment, this ultimate guide to Pfaff embroidery machines is a great resource for seeing what professional-grade equipment can do.
Each technique brings something unique to the table. To get a closer look at what’s possible for your brand, dive into our detailed overview of custom printing options.
How to Prepare Your Artwork for a Perfect Print

The secret to a fantastic custom t-shirt isn’t just the printing method or the quality of the garment—it all starts with your artwork. Nine times out of ten, production delays and disappointing results can be traced back to a design file that simply wasn't ready for the printer. Getting this step right from the outset is crucial for making sure the final product looks exactly as you imagined it.
Think of your design file as the blueprint for a house. If that blueprint is blurry, incomplete, or uses the wrong measurements, the finished building is going to have some serious problems. It’s the same story when you're getting a logo or design printed on t-shirts; a clean, correctly formatted file is absolutely non-negotiable for a professional finish.
Understanding Vector and Raster Files
First things first, let's get our heads around the two main types of image files: vector and raster. They might look the same on your screen, but to a professional printer, they're worlds apart and built for very different jobs.
-
Vector Files (AI, EPS, PDF, SVG): Imagine your design is made of mathematical equations. Vector graphics use lines, points, and curves defined by these equations. This means you can scale them up to the size of a billboard or down to a tiny lapel pin, and they will never lose quality. The edges will always stay perfectly crisp and sharp. This is why vector is the gold standard for screen printing.
-
Raster Files (JPG, PNG, GIF, TIFF): Now, think of a digital photo. Raster images are built from a grid of tiny coloured squares called pixels. When you try to make a raster image bigger, you’re just stretching those pixels out, which is why the image starts to look blurry or "pixelated." This format is fine for DTG printing, but only if the file is large and high-resolution to begin with.
For screen printing, a vector file is almost always what you'll need. Its incredible scalability ensures your logo’s edges are clean and professional, no matter the final size. For a photorealistic design printed with DTG, a high-resolution raster file is the only way to capture all that detail without it turning into a blurry mess.
Key Technical Specs for Your Artwork
Beyond the file type, a few technical details can make or break your print job. Nailing these will help you speak the same language as your printer and dodge common pitfalls.
Resolution (DPI) This one’s for raster files. DPI stands for Dots Per Inch and it measures the density of pixels in an image. For a sharp, clear print on a t-shirt, your artwork needs to be at least 300 DPI at the final, intended print size. An image you've saved from a website is likely 72 DPI—it looks fine on screen, but it will come out looking fuzzy and unprofessional on fabric.
Colour Mode (CMYK vs RGB) Your computer monitor displays colours using the RGB (Red, Green, Blue) colour model, which is based on mixing light. Professional printers, on the other hand, work with the CMYK (Cyan, Magenta, Yellow, Black) model, which is based on mixing ink. To make sure the colours printed on the t-shirts match what you see on screen, your files should always be converted to CMYK before you send them off.
Outlining Fonts If your design includes any text, the font you’ve used needs to be "outlined" or "converted to curves." This simple but vital step turns the text from an editable font (which your printer might not have installed) into a fixed vector shape. It guarantees your chosen typography prints exactly as you intended, with no surprise font substitutions.
Taking the time to prepare your artwork correctly is the best thing you can do to ensure a smooth, headache-free process. For a more detailed walkthrough, check out our guide with more artwork submission tips for beginners.
Key Factors That Influence Your Final Order
Once you've decided between screen printing and DTG, a few other crucial details come into play. These are the things that will ultimately shape the cost per shirt, the quality of the final print, and even how fast you get your hands on your order. Getting these right is the secret to keeping your budget in check and ensuring your project goes off without a hitch.
Think of it like planning a big event. You wouldn't just book a venue without knowing your guest numbers, menu, or the date. Ordering custom tees is much the same—a little bit of forward-thinking about the fabric, quantity, and your timeline makes all the difference.
Why Fabric Composition Matters Most
The type of fabric your t-shirt is made from is probably the biggest decision you'll make after picking the printing method. It's not just about how the shirt feels; the material actually dictates which printing techniques are possible and how vibrant your design will ultimately look. Different inks and processes react very differently to specific fibres.
Here’s a quick rundown on how common fabrics work with different printing methods:
- 100% Cotton: This is the gold standard for both Direct-to-Garment (DTG) and screen printing. Its natural fibres are incredibly absorbent, letting water-based DTG inks soak right in for a super soft, breathable finish. Screen printing ink also sticks to cotton like a dream, producing rich, solid colours.
- Polyester and Polyester Blends: If you're thinking about dye sublimation, you absolutely need a synthetic fabric like polyester. The sublimation process works by bonding ink directly into the polyester fibres on a molecular level. Trying to sublimate on cotton is like trying to mix oil and water—it just won’t stick.
- Tri-Blends (Cotton/Polyester/Rayon): Everyone loves these for their soft, vintage feel. They’re a great match for screen printing and some heat transfers, but be aware that the mixed fibres can give the print a slightly faded or "heathered" look. Of course, that’s often the exact style people are going for.
Selecting the right garment is a foundational step. If your design is a full-colour photograph, choosing a 100% cotton t-shirt for DTG printing is non-negotiable for achieving a vivid, high-quality result. Conversely, for vibrant, all-over activewear designs, a polyester garment suitable for sublimation is the only path forward.
How Order Volume Creates Big Savings
One of the biggest levers you can pull to change the price of your custom tees is the quantity you order. The idea of "economy of scale" is massive in the printing world, especially for screen printing. The more shirts you order, the less you pay for each one.
This is all down to the setup involved. Methods like screen printing require a fair bit of upfront work. A separate screen has to be made for every single colour in your design, and that comes with a fixed cost whether you're printing 20 shirts or 2,000.
When you place a large order, that initial setup cost gets spread across hundreds of garments, which can dramatically drop the price of each individual shirt. For DTG or heat transfers, the setup per shirt is much smaller, so the price breaks aren't quite as steep, but you'll still usually get a volume discount. This is something to really think about when planning for big promotional campaigns or events.
The Australian apparel market is growing strong, with more and more businesses investing in branded merch. The market is projected to hit around AUD 45.53 billion by 2035, opening up huge opportunities for custom gear. You can dig deeper into these trends in this Expert Market Research report.
Planning Your Production Timelines
Finally, don't underestimate how important it is to allow enough time for production and delivery. A rushed order isn't just stressful; it can limit your printing options or land you with some pretty hefty express fees. A realistic timeline will depend on the printing method and how busy your supplier is.
Here are some general timelines to keep in mind:
- Screen Printing: This usually takes 7-14 business days once your artwork is approved. Because of the multi-step setup (making screens, mixing inks), it's not a great option for last-minute jobs.
- DTG Printing: Often a quicker choice for smaller orders, with turnarounds of about 5-10 business days. The process is more direct, skipping the lengthy setup of screen printing.
- Dye Sublimation & Heat Transfer: These methods typically land somewhere in the 7-12 business day range, based on the order's complexity and size.
Always double-check lead times with your supplier and try to build in a little buffer for shipping. It's also worth knowing how delivery can affect your deadline; we always suggest looking into your options, including services that offer free freight across Australia. Planning ahead is the best way to make sure your t-shirts arrive well before you need them, giving you one less thing to worry about.
How to Proof and Care for Your Printed T-Shirts
Once your artwork is finalised and the order details are locked in, there are two crucial stages left: proofing and after-care. It's tempting to rush through these, but they are absolutely essential for making sure you're happy with the final product and that your new shirts last the distance.
Skipping the proofing stage, in particular, is a huge gamble. Think of it as the final check before a plane takes off—it’s your last chance to catch any issues while they’re still simple and, most importantly, free to fix. A few minutes of careful review can save you from the nightmare of unboxing hundreds of t-shirts with a glaring typo or a colour that's just not right for your brand.
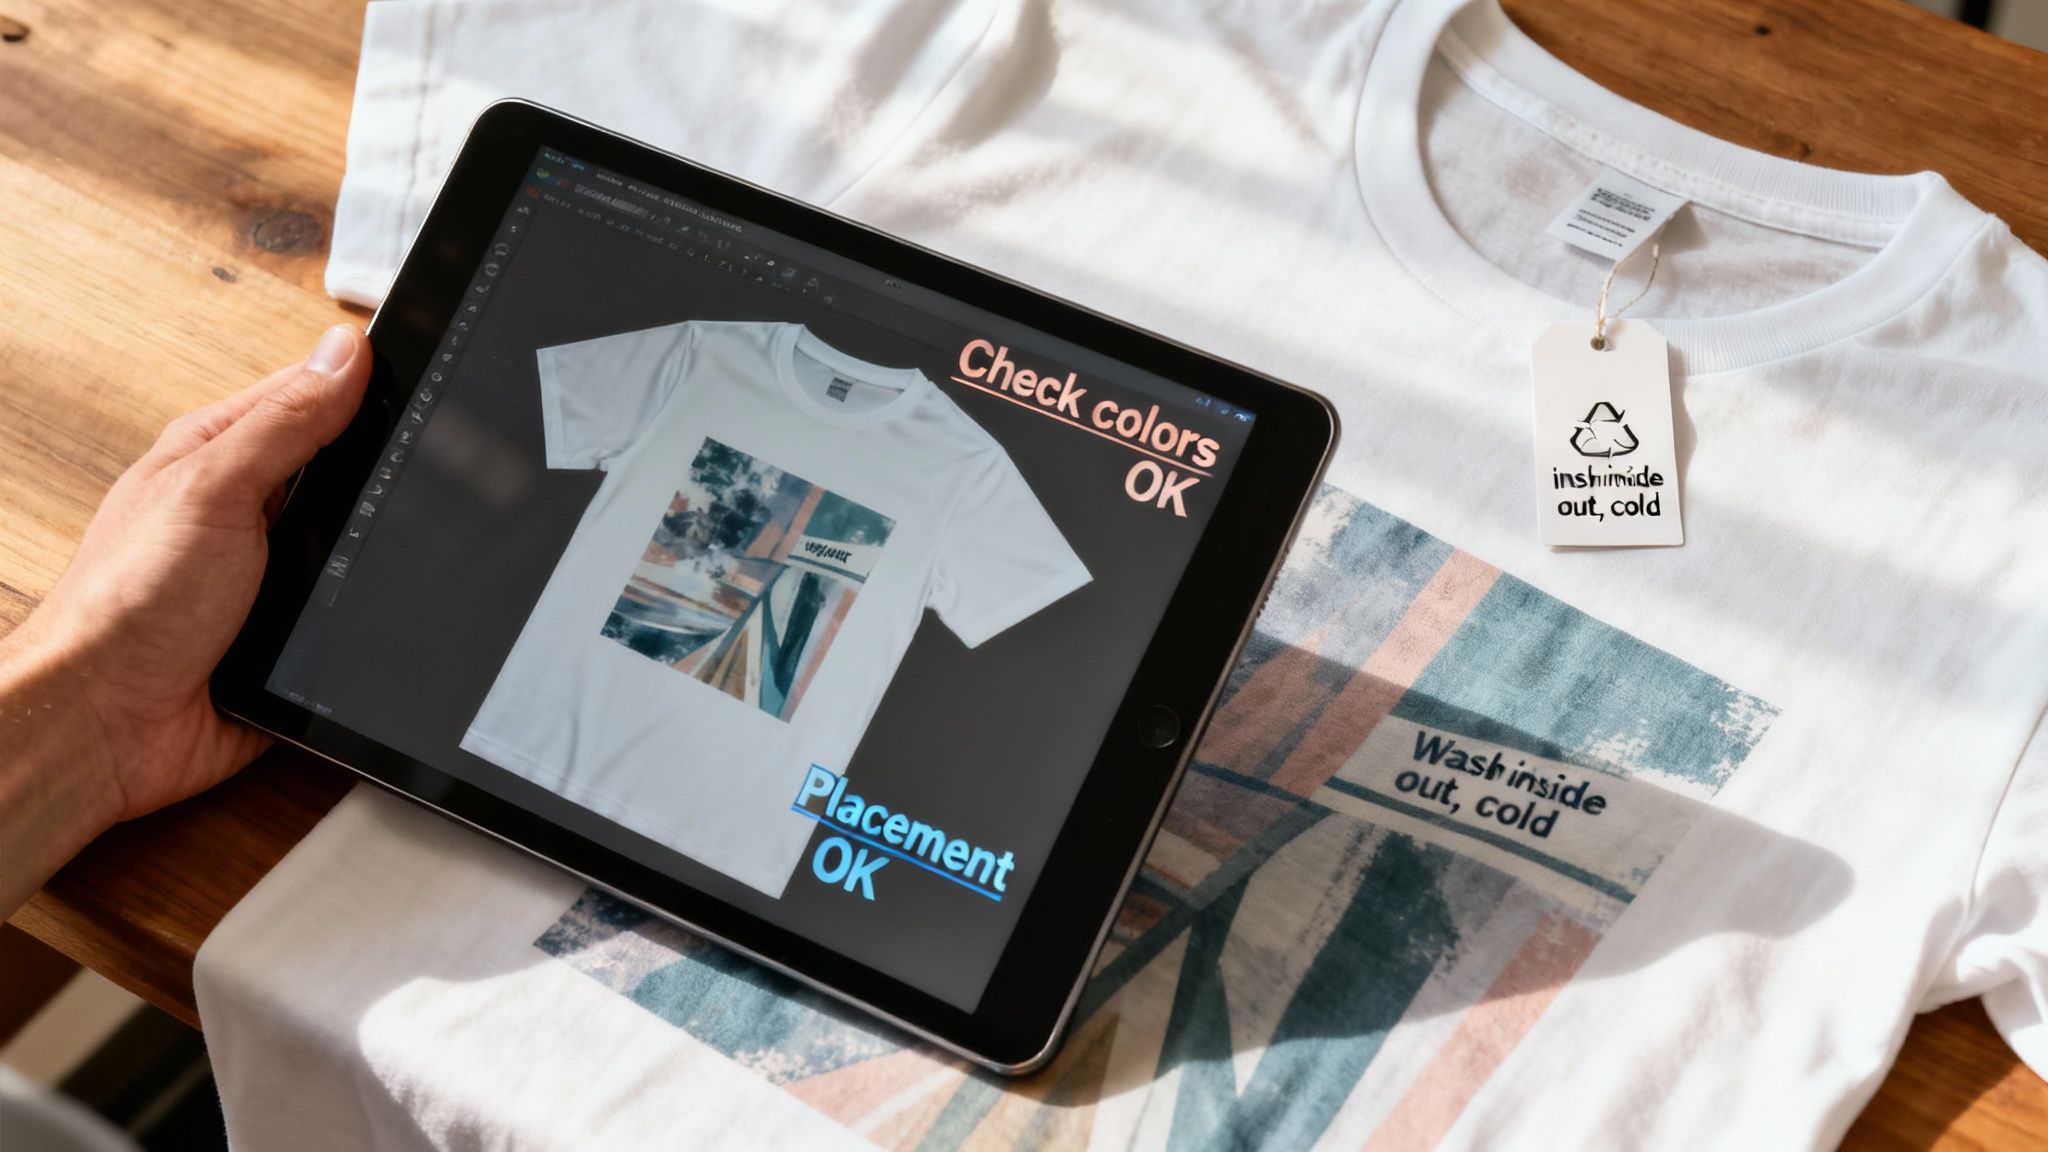
What to Check on Your Digital Proof
Before you give the go-ahead, always insist on seeing a digital proof. This is a mockup from your supplier that shows you exactly how your design will look on the finished t-shirt.
Take your time and check these key details:
- Spelling and Grammar: Read every single word. You'd be surprised how easily a small typo can sneak past everyone's eyes.
- Colour Accuracy: Do the colours on the proof match your brand’s official Pantone (PMS) codes? Keep in mind that colours can look different from screen to screen, but the proof is your best guide.
- Design Placement and Size: Is the logo sitting exactly where you pictured it? Is it the right size for the shirt? Double-check its position (e.g., centre chest, left chest) and its measurements.
- Overall Layout: Make sure every part of your design is there and arranged correctly.
Giving your approval on the proof is like signing off on the final blueprint. It's the official record that you and the printer are on the same page, preventing any nasty surprises when the order arrives.
Extending the Life of Your Printed T-Shirts
The job isn't done once your t-shirts arrive. How you care for them makes a massive difference to how long the print stays vibrant and sharp. Giving your team or customers a few simple care instructions is a nice touch that adds value and shows you've invested in quality.
Just follow these simple tips to keep the print looking brand new.
Washing Instructions:
- Turn the T-Shirt Inside Out: This is the golden rule. It creates a protective barrier for the print, shielding it from the rubbing and friction of other clothes in the wash.
- Wash in Cold Water: Always opt for a gentle cycle with cold water. Hot water is the enemy—it can cause the garment to shrink and the print to fade or crack.
- Use a Mild Detergent: Steer clear of harsh detergents and bleach. They can break down the ink and damage the fabric fibres over time.
Drying and Ironing:
For the best results, hang the t-shirt to air dry if you can. If you have to use a dryer, stick to the lowest heat setting. High heat is the quickest way to ruin a print, causing it to crack and peel.
And if you absolutely must iron the shirt, make sure it’s still inside out and use a low heat setting. Never, ever iron directly over the print itself.
Your Essential T-Shirt Ordering Checklist
Ordering custom t-shirts for the first time can feel like a lot to juggle, but a simple checklist can make the whole thing a breeze. It’s about making sure nothing gets missed before you sign off on the order. Using a checklist helps you move from a rough idea to a box of fantastic-looking shirts with total confidence, steering clear of common pitfalls that lead to delays or disappointment.
Think of it as your pre-flight check before your branded apparel project takes off. Ticking off each item one by one ensures every detail—from your design file to the delivery date—is sorted. It’s the best way to set yourself up for a smooth run.
Pre-Order Confirmation
Before you get too far down the track, it’s smart to get the foundations of your project sorted. Answering these questions first will save you a heap of time and prevent costly changes later on.
- What’s the Goal? Are these shirts for a promotional giveaway, a new product for your online store, staff uniforms, or a one-off event? The purpose will directly shape your choice of t-shirt quality and the best printing method to use.
- What’s Your Budget? How much are you looking to spend in total, and what’s your target cost-per-shirt? Nailing this down helps you narrow down your options right from the start.
- How Many and What Sizes? You’ll need a specific breakdown of how many shirts you need in each size (e.g., 15 Small, 30 Medium, 25 Large, 10 XL). This is absolutely critical for getting an accurate quote.
- What’s Your Deadline? When do you physically need the shirts in your hands? Be realistic and make sure you communicate this date clearly from your very first conversation.
Artwork and Garment Specifications
With the basic plan in place, it’s time to lock in the details of the design and the actual t-shirts. Getting these specifics right ensures the final printed on t shirts are a perfect match for your brand.
- Artwork Files: Are your design files actually ready for printing? Make sure they’re in the right format (vector files are best for screen printing, high-resolution images for DTG) and the correct colour mode.
- Colour Matching: Have you supplied specific Pantone (PMS) colour codes for your brand colours? This is the only foolproof way to guarantee the colours on the shirt look exactly as they should.
- Garment Selection: Have you decided on the exact t-shirt style, the fabric (like 100% cotton or a blend), and the colour?
- Proof Approval: Have you asked for a digital proof? Don't skip this! You need to carefully check it for any spelling mistakes, and to confirm the design placement and size are what you envisioned.
This checklist is your safety net. Taking a few extra minutes to double-check each point ensures your vision is communicated perfectly, leading to a final product that truly represents your brand without any nasty surprises.
Once your custom t-shirts arrive, you'll want to show them off. If you're selling at local markets or events, you can find some great display ideas for craft fairs to make your setup pop.
When you're ready to get started, you can easily request for a quote and we'll help you kick off your project.
Your T-Shirt Printing Questions, Answered
Once you’ve locked in your design and picked the perfect garment, a few last-minute questions often come up. Getting these sorted is key to ordering with confidence and knowing you'll love the final result.
Here are the most common questions we get from Australian businesses just like yours, along with some straight-talking answers.
What’s the Smartest Choice for a Big Event?
If you're ordering for a large group – say, 50 or more t-shirts – and your design is fairly simple (think 1-4 colours), screen printing is your go-to. It’s hands-down the most cost-effective method for bulk orders.
There’s an initial cost to create the stencils, or 'screens', for each colour in your design. But once that's done, the cost gets divided across all the shirts. The bigger your order, the lower the price per t-shirt becomes. It’s a classic case of economy of scale.
How Can I Be Sure the Print Colour Is an Exact Match for My Brand?
For dead-on colour accuracy, you need to talk in Pantone Matching System (PMS) colours. Think of PMS as a universal language for colour. It gives your printer the exact formula to mix the ink, so the final print perfectly matches your brand guidelines.
Just relying on how a colour looks on your computer screen is a recipe for disappointment. Screens use an RGB light model, which can look very different from the CMYK inks used for printing. What looks like the perfect teal on your monitor might come out as a dull blue on fabric.
PMS codes take all the guesswork out of it. It's the industry standard for making sure the logo on your t-shirts is the exact same shade as the one on your business cards, keeping your branding consistent and professional.
Is It Possible to Print a Photo on a Black T-Shirt?
Absolutely, and it can look fantastic! The best way to print a detailed, full-colour photograph onto a dark t-shirt is with Direct-to-Garment (DTG) printing.
The magic is in the prep work. The DTG printer first lays down a solid layer of white ink, creating an 'underbase'. This opaque foundation acts as a bright, blank canvas, stopping the dark fabric from muting the colours. Your photo is then printed right on top, making it pop with sharp, vibrant detail.
What’s a Standard Minimum Order?
The "minimum order quantity" (or MOQ) really depends on the printing technique you've chosen. They're all quite different.
- Screen Printing: Because of the setup involved, you’re usually looking at a higher minimum, typically starting around 20-50 t-shirts.
- DTG & Heat Transfer: These are much more flexible. With virtually no setup per design, they're perfect for one-off prints or really small runs.
It's always a good idea to check the MOQ with your supplier first. It will help you choose the right method for your budget and the number of shirts you actually need.
Ready to create branded apparel that gets you noticed? The expert team at Simply Merchandise is here to guide you through every step, from artwork preparation to final delivery. Explore our huge range of customisable products and get a free quote today at https://simplymerchandise.com.au.
Related Posts

The Power of Promotional Products
Why Use Promotional Products? In a digital world that’s constantly shouting for attention, the right promotional product does...
Read More
Personalised Water Bottle Australia: 2026 Guide
Find your perfect personalised water bottle australia with our expert guide for 2026. Choose materials, branding, & suppliers for max...
Read MoreInvalid password
Enter

