

Ready to really get your brand seen? Custom embroidered caps are one of the best ways to do it. They’re a powerful, wearable marketing tool that turns your team and your clients into walking billboards, creating a real, tangible connection to your company.
Why Custom Embroidered Caps Are a Smart Brand Investment
Think of a custom embroidered cap as more than just headwear; it's a strategic piece of your marketing puzzle. It’s essentially a mobile advertisement with a personal touch. When your team wears branded caps at a trade show, a local community event, or even just on their daily commute, they're actively building brand recognition and showing off a unified, professional look.
This simple accessory also does wonders for team spirit, making employees feel like valued ambassadors. This guide will walk you through everything, from picking the perfect cap that matches your brand’s vibe to understanding the artwork files needed to bring your logo to life. Before diving in, it's a great idea to think strategically by creating a robust business plan for custom apparel, which helps lay the groundwork for success.
A Growing Market for Brand Identity
The desire for personalised gear isn't just a fleeting trend; it's a serious market force. Here in Australia, the embroidery market is tipped to grow at a compound annual growth rate (CAGR) of 5.6% from 2025 to 2031.
This steady growth shows a strong and rising demand for customised items, with the good old embroidered cap right at the top of the list.
Investing in custom embroidered caps means you're tapping into a proven marketing channel that connects with today's customers, who genuinely value authenticity and unique branding.
The Benefits of Embroidered Headwear
So, why choose caps over other promotional items? The advantages are clear and deliver a return far beyond the initial cost.
-
Lasting Visibility: A digital ad is gone in a flash, but a quality cap can be worn for years. That’s continuous brand exposure, day in and day out.
-
Practical Utility: Let's be honest, caps are genuinely useful. They offer sun protection and are a staple accessory for many Aussies, which means they get worn often, not just stuffed in a drawer.
-
Perceived High Value: An embroidered logo just feels more premium and permanent than a print. This perceived quality reflects well on your brand, suggesting you care about durability and the little details.
Choosing the Right Cap Style and Material
Getting your custom embroidered cap project started on the right foot means picking the perfect base. The style and material you land on will do more than just shape the look and feel—it determines how well the cap represents your brand and what it’s actually like to wear. It’s the difference between a cap that becomes a daily favourite and one that gathers dust on a shelf.
Your first decision is all about the cap's structure. Think of it like the frame of a house; it sets the entire shape and presence of the headwear.
Structured Versus Unstructured Caps
A structured cap has a stiff lining (we call it buckram) behind the front two panels. This gives it a rigid shape that holds firm, creating that classic, crisp profile that stands tall. It's the traditional baseball cap look, and it's absolutely ideal for bold logos that need a clean, flat canvas. This style just screams professionalism and stability, making it a go-to for corporate uniforms and sports teams.
On the flip side, an unstructured cap is exactly what it sounds like—it has no internal support. This makes it softer, more pliable, and allows it to conform to the wearer's head for a really relaxed, casual "dad hat" vibe. Unstructured caps are perfect for lifestyle brands, creative agencies, or any business that wants to project a more approachable, comfortable feel.
This choice is the first step in turning a simple piece of headwear into a symbol of your brand and a unifying item for your team.
As you can see, the physical cap is just the starting point. The right choice helps build your brand identity and, ultimately, a real sense of community.
Exploring Popular Cap Styles
Once you've settled on the structure, you can dive into the specific styles. Each type has its own distinct personality and is better suited to different situations.
- Baseball Caps: The timeless classic. With their rounded crown and curved brim, they are versatile enough for pretty much anything, from everyday staff uniforms to promotional giveaways at your next event.
- Snapbacks: You'll know these by their flat brim and adjustable plastic snap closure. Snapbacks have a modern, streetwear-inspired look, making them a fantastic choice for connecting with younger audiences or brands with a contemporary edge.
- Trucker Hats: These feature a foam front panel and a breathable mesh back. That design makes them incredibly comfortable in the hot Aussie sun, perfect for outdoor events, trade shows, or businesses in industries like construction and logistics.
The style you choose sends an immediate message. A sleek snapback says your brand is modern and on-trend, while a classic cotton baseball cap conveys reliability and tradition. Aligning the cap's personality with your brand's is key.
Selecting the Ideal Material
The fabric of the cap is just as crucial as its style. It impacts everything—durability, comfort, and how the final embroidery looks. The material should always line up with how the cap is going to be used.
For example, a cap for your team working outdoors will have completely different needs than one intended as a premium corporate gift. You can explore a wide variety of our headwear options to find the perfect match for what you have in mind.
To make things a bit easier, here’s a quick-reference guide to help you choose the best cap style based on common business needs.
Comparing Cap Styles for Your Business Needs
| Cap Style | Best For | Common Materials | Key Feature |
|---|---|---|---|
| Baseball Cap | Uniforms, giveaways, general branding | Cotton, Polyester | Versatile, classic curved brim |
| Snapback | Fashion brands, youth marketing | Wool Blends, Cotton | Modern flat brim, adjustable snap |
| Trucker Hat | Outdoor work, events, transport industry | Foam/Cotton, Polyester Mesh | Breathable mesh back, high-profile front |
This table should help you narrow down the options, but let's look a little closer at the fabrics themselves.
Common Cap Materials Compared
Making the right choice comes down to balancing function with feel. Here’s a breakdown of the most popular materials you'll find for custom embroidered caps.
- Cotton Twill: This is easily the most common and versatile cap material out there. Its diagonal weave makes it incredibly durable and resistant to wear and tear. It’s breathable, comfortable, and gives us a smooth, stable surface that’s absolutely perfect for detailed embroidery.
- Polyester: Often used in performance or athletic caps, polyester is lightweight, moisture-wicking, and dries quickly. It's an excellent choice for sports teams, fitness centres, or any brand associated with an active lifestyle.
- Wool Blends: If you're after a classic, premium feel, a wool blend is the way to go. These caps offer excellent structure and a more sophisticated look. They're a popular choice for fashion-forward brands and high-end corporate merchandise, often seen in snapback and fitted styles.
Ultimately, the best choice is a combination that reflects your brand’s identity and meets the practical needs of the people who will be wearing them. A well-chosen style and material ensure your custom embroidered caps don't just look fantastic but also deliver lasting value and impact.
Bringing Your Design to Life: Embroidery Techniques and Placement
You’ve picked the perfect cap. Now for the fun part: turning that blank canvas into a standout piece of branding with custom embroidery. This is where your logo truly comes alive, and understanding your options is the key to getting a result that pops.
The technique you choose will shape the entire look and feel of your embroidered caps custom order. It’s more than just stitching; it’s about selecting a method that not only suits your design but also captures the personality of your brand.
Standard Flat Embroidery: The Timeless Classic
There's a reason standard flat embroidery is the industry workhorse—it's clean, versatile, and incredibly professional. The process involves stitching your design directly onto the cap's fabric, creating a sharp, two-dimensional finish.
Think of it as painting with thread. This technique is brilliant for capturing fine details, crisp text, and complex logos with multiple colours. It's the go-to for corporate branding, team uniforms, or any situation where you need your logo to be clear and precise. The end result is durable, sophisticated, and always in style.
If you’re curious about the nuts and bolts of the process, you can learn more about what embroidery is and how we turn a digital file into a stitched masterpiece.
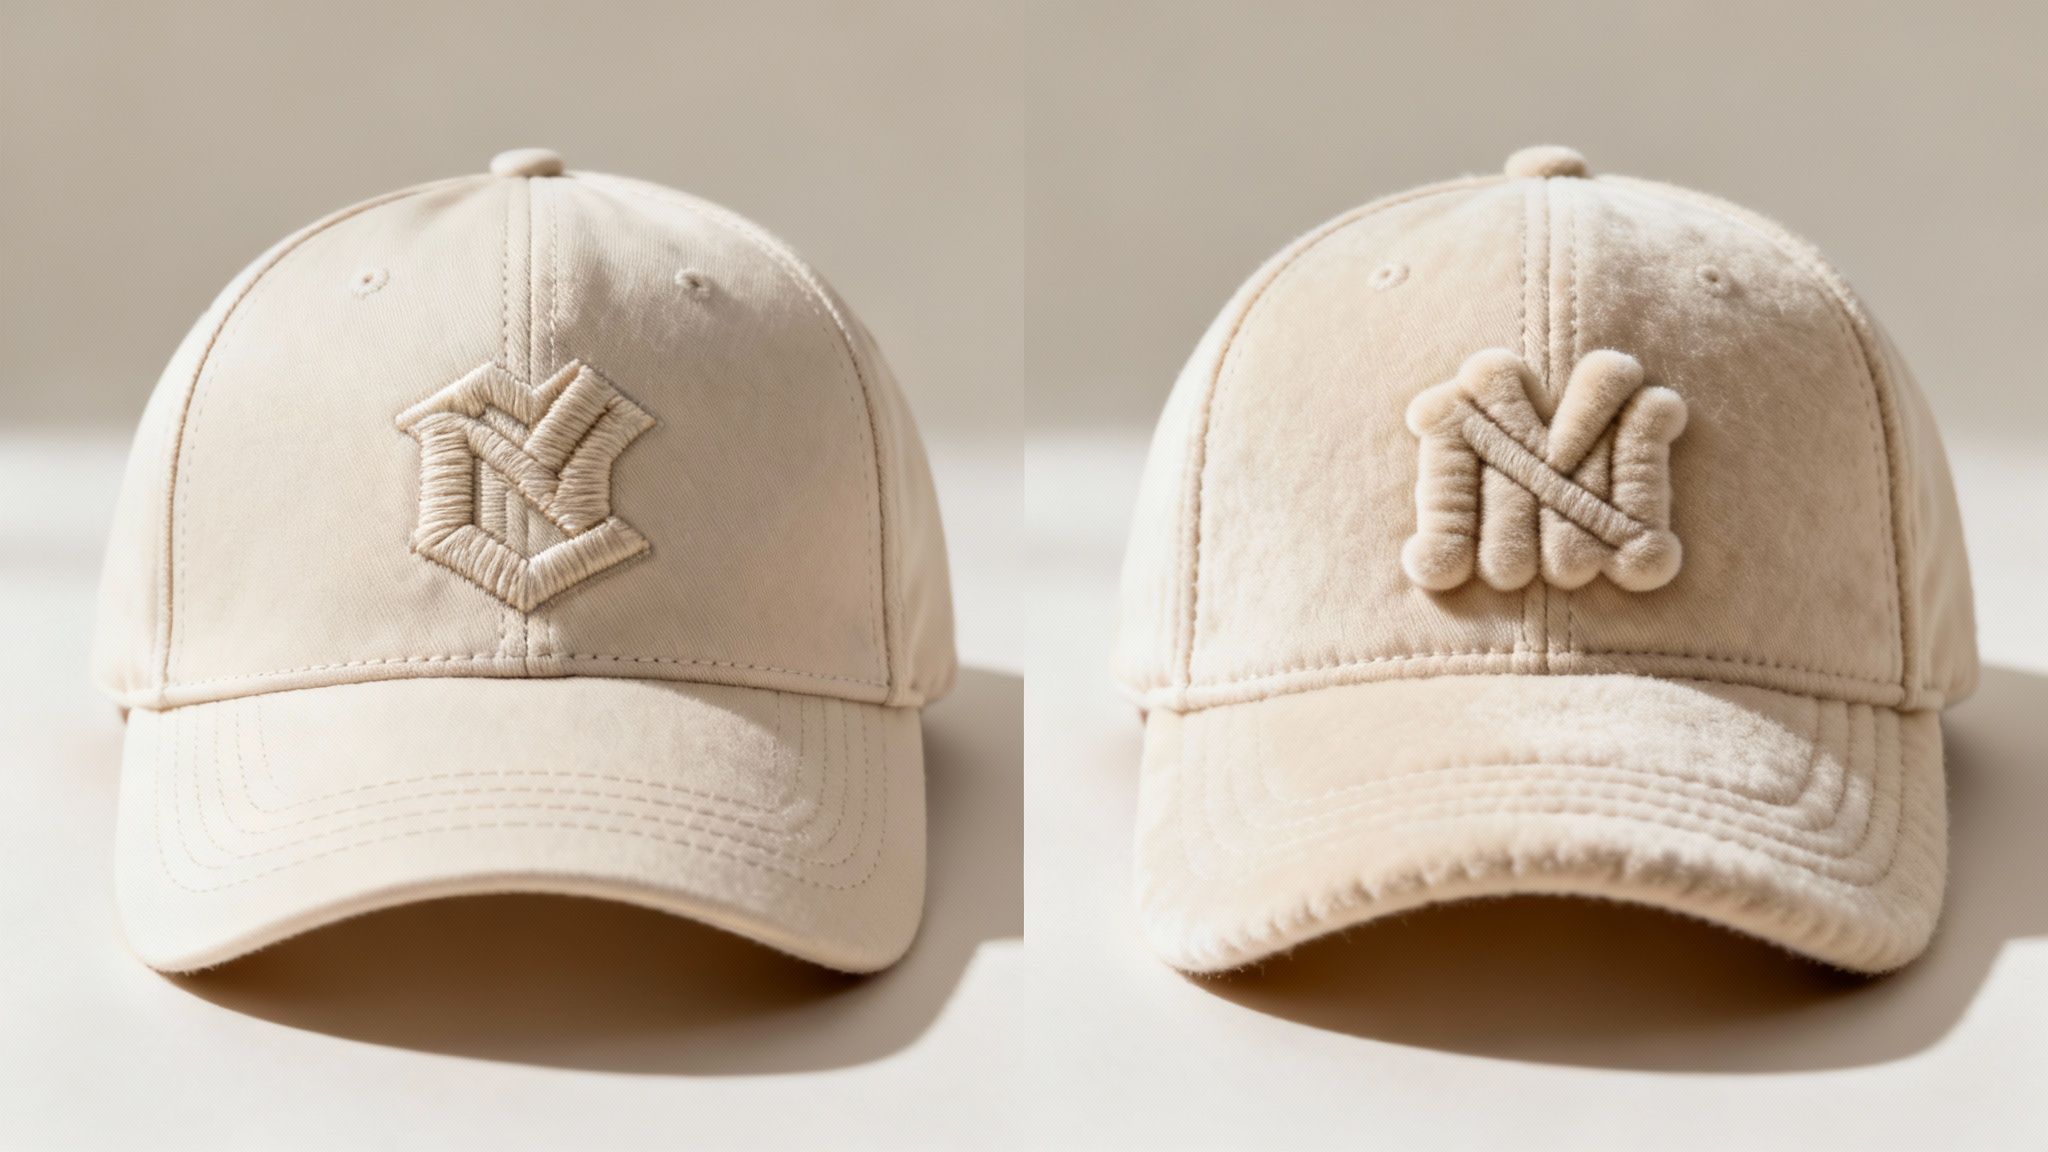
3D Puff Embroidery: For Making a Bold Statement
If flat embroidery is like painting, 3D puff is like sculpting. This is the technique you choose when you want your logo to literally stand out. We start by placing a special foam underlay onto the cap, then we stitch over it, creating a raised, three-dimensional effect that has a fantastic tactile quality.
3D puff embroidery gives your cap a premium, high-end feel that instantly boosts its perceived value. It’s perfect for making simple, bold designs—like a single initial, an icon, or block text—jump off the fabric.
Just keep in mind that this method works best with simpler designs. The foam underlay doesn’t play well with intricate details or tiny lettering. It’s a favourite for streetwear brands, sports teams, and anyone wanting to project a confident, modern image.
Where to Put Your Logo: Strategic Placement Options
The 'what' is important, but so is the 'where'. The placement of your logo is a crucial decision that affects both visibility and style. The front is the obvious choice, but it's not your only option.
Let's break down the most popular spots:
- Front and Centre: This is prime real estate. A logo placed here gets maximum visibility and makes the most direct impact. It’s the perfect spot for your main company logo.
- Side Panels (Left or Right): A great spot for a secondary logo, icon, or even your website URL. Side placement offers a more subtle, refined look.
- Back Arch: The area over the back closure is ideal for a tagline, company name, or an "Established" date. It gives your brand visibility from all angles, offering true 360-degree branding.
- Back Strap: For caps with an adjustable fabric strap, adding a tiny detail here is a really nice touch. It’s an understated choice that shows you’ve thought about every detail.
The real magic happens when you pair the right technique with the right placement. Imagine a bold, 3D puff logo on the front panel, complemented by a slick, flat-embroidered website address on the back. By thinking strategically, you can create a custom cap that’s not just merchandise, but a truly effective marketing tool.
How to Prepare Your Artwork for Flawless Embroidery
![]()
Sending us the right artwork file is the single most important step in getting a perfect finish on your custom caps. Think of your design file as the blueprint for our embroidery machines. The cleaner the blueprint, the better the final result will be. This guide will walk you through exactly what you need to do to get it right from the very start.
Nailing your artwork means your logo or design will be translated into thread with absolute precision. If you're creating a design from scratch, understanding the basics of what makes a good logo, like learning how to draw a logo, can make a world of difference to the final embroidered product. A strong design is the foundation of a premium finish.
Vector vs Raster: The Blueprint Analogy
The type of file you send us matters. A lot. For embroidery, vector files are the gold standard. We’re talking about formats like .AI (Adobe Illustrator), .EPS, and .SVG.
Think of a vector file as a set of instructions for drawing your logo. It uses mathematical lines, points, and curves that can be scaled infinitely without losing quality. We can make it tiny for a cap strap or huge for a banner, and it will stay perfectly crisp and sharp every time.
On the other hand, a raster file (like a .JPG or .PNG) is more like a mosaic made of tiny coloured squares called pixels. It looks fine at its original size, but when you try to enlarge it, those pixels just get bigger, making the image blurry and jagged. That’s a nightmare for creating clean embroidery.
Key Takeaway: Always, always try to send your logo in a vector format. It gives us the clean, scalable foundation we need to create a high-quality stitch pattern, saving everyone time and guaranteeing a professional result for your custom embroidered caps.
Getting into the Details: Line Thickness and Text Size
Embroidery isn't print; we're working with physical thread that has its own thickness. This means super-fine details in a digital design can sometimes get lost when stitched onto fabric. Lines that are too thin might disappear, and tiny text can quickly become an unreadable blob.
To make sure your design comes out looking clean and legible, here are a couple of simple rules of thumb:
- Minimum Line Thickness: Aim for your lines to be at least 1mm thick. Anything less than that can easily get lost in the texture of the cap.
- Minimum Text Height: For text to be clear and readable, each letter should be at least 6-7mm high. This gives the stitches enough room to form each character properly.
Making these small tweaks can have a massive impact on the final look of your custom headwear. For a deeper dive into file types, check out our complete guide on artwork submission tips.
The Magic of Digitising
Once we have your perfect vector file, the last crucial step before stitching is digitising. This is a highly skilled process where we convert your digital artwork into a "stitch map"—a special file that tells our embroidery machines exactly what to do.
It’s not just a simple file conversion. A skilled digitiser manually plots every single stitch, deciding on the stitch type, direction, and density to best replicate your logo in thread. It’s a true craft that requires an expert eye to get right. This high-quality digitising is the real secret behind every great-looking embroidered cap.
Breaking Down Costs and Order Timelines
Getting your head around the budget and timeline for a custom cap order is the first step to a successful campaign. The final price tag isn't just one number; it’s a mix of a few key ingredients. Once you know what they are, you can make smart choices that fit your budget and deadline perfectly.
The biggest factor influencing your cost is something we call stitch count. Put simply, this is the total number of stitches needed to bring your design to life on the cap. A big, detailed logo with lots of solid colour will have a much higher stitch count than a few lines of text. More stitches mean more machine time and more thread, which naturally affects the cost per cap.
Design complexity also plays a big part. If your logo has five different colours, the machine needs to be set up for each one. Likewise, if you’ve opted for a premium technique like 3D puff embroidery, the extra materials and specialised process are factored into the price.
Unpacking Minimum Order Quantities
When you order custom gear, you’ll almost always hear the term Minimum Order Quantity (MOQ). This isn't just a random number we pull out of a hat; it’s all about the economics of setting up the machines. Every embroidery job starts with a fair bit of prep work, from digitising your artwork to programming the equipment.
Spreading that one-off setup cost across a big batch of caps makes each individual item much more affordable. If you only order a handful, that initial cost is divided by a smaller number, pushing the price per cap up. It's why ordering in bulk is nearly always the more cost-effective way to go.
Think of it like a commercial bakery. Firing up the big oven just to bake a single cupcake is pretty inefficient. But baking a hundred at once? The cost of energy and prep per cupcake drops right down. The same logic applies to embroidery.
Standard Production vs Express Options
Planning ahead is always your best bet, but we get it – sometimes you need things yesterday. Our standard production timeline gives us the breathing room to handle your artwork with care, digitise it perfectly, run the embroidery, and perform quality checks without cutting any corners.
But for those moments when a deadline sneaks up on you, we have express options. This service bumps your order to the front of the queue, slashing the turnaround time. It’s a lifesaver for last-minute events or surprise opportunities, but it does come with a premium to cover the cost of shuffling the production schedule and fast-tracking your job.
The best way to see exactly what your project will cost is to get a detailed breakdown. You can easily see how different quantities and design choices affect your budget by using a custom quote request.
The Australian Embroidery Market Context
The appetite for quality custom apparel here in Australia is massive, and embroidery is a huge part of that. In fact, projections show the entire Asia Pacific embroidery market is on track to hit US$854.75 million by 2025.
Drilling down further, Australia is expected to make up about 8.03% of that, which means a local market value of around US$68.6 million. This isn't just a number; it shows how many Aussie businesses are investing in top-notch branded gear like custom caps. You can read more about these market trends on cognitivemarketresearch.com.
By understanding how costs and timelines work, you can plan your promotional budget with confidence. Whether you’re placing a standard order well in advance or need a rush job for an upcoming trade show, knowing these details helps you get the best possible return on your investment and create caps that people will actually want to wear.
Bringing It All Together: Ordering and Caring for Your Caps
You’ve navigated the styles, picked the perfect material, and got your artwork sorted. Fantastic! Now for the exciting part: turning that design into a real, tangible cap for your brand. This final stage is all about locking in the details and making sure your new caps look brilliant for years to come.
Getting started is simple. It all begins with a quote and a final look at your design. When you send us your artwork, we’ll whip up a digital proof, which is essentially a mock-up of your finished cap. This is your moment to be the head of quality control – give it a thorough look-over before signing off.
The All-Important Digital Proof
Think of the digital proof as the architect's final blueprint before the builders get to work. It’s a preview that shows exactly where your logo will sit, the colours we’ll use, and how big it will be. Spotting a tiny mistake at this stage is a hundred times easier than fixing a whole batch of caps later.
Here’s a quick checklist for reviewing your proof:
- Spelling & Details: Are all the names, words, and numbers absolutely correct? One last check can save a world of pain.
- Colour Check: Do the thread colours on the proof match your brand’s palette? We get them as close as possible, but it’s good to confirm.
- Placement & Scale: Does the logo look centred, or off-to-the-side, just as you wanted? Does its size feel right on the cap?
- The Big Picture: Take a step back. Does the whole thing look balanced, sharp, and professional?
Once you give us the thumbs-up, your order heads straight into production. This is where our skilled team gets to work, using our high-tech equipment to make sure every single stitch is placed with precision. If you’re curious about how the magic happens, you can learn more about our in-house custom embroidery services and the gear we use to get that premium finish.
Keeping Your Custom Caps Looking Fresh
Your embroidered caps are a walking advertisement for your brand, so keeping them in great nick is key. Proper care protects not just the fabric but the detailed embroidery, ensuring they always give off a professional vibe.
Just tossing them in the washing machine is the quickest way to a sad-looking cap. The aggressive spin cycle can wreck the cap’s shape, while the threadwork can easily end up frayed or puckered.
Pro Tip: Whatever you do, keep your embroidered caps out of the clothes dryer. The intense heat is a killer—it can shrink the material, warp the plastic inside the brim, and ruin the crown’s shape for good.
A little bit of care goes a long way. Just follow these simple pointers to keep them looking brand new.
Easy Cleaning and Storage Guide
You don’t need any fancy tools to look after your caps, just a bit of know-how. These steps will protect the shape, colour, and embroidery, giving them a much longer life.
- Spot Clean First: For small marks or sweat bands, spot cleaning is your best friend. Mix a tiny bit of mild detergent with cool water, and gently dab the spot with a clean cloth.
- Hand Wash for a Full Clean: If the whole cap needs a refresh, fill a sink or basin with cool water and a drop of gentle detergent. Let the cap soak for about an hour, then give it a good rinse under cool water.
- Air Dry the Right Way: Gently pat the cap with a towel to get rid of most of the water. To help it keep its shape, find something to rest it on while it dries—a coffee jar or even a rolled-up towel works perfectly. Just let it air dry naturally, away from direct sun.
Got Questions About Custom Caps? We've Got Answers
Stepping into the world of custom apparel can feel a bit daunting, and it's natural to have questions when you want to get your branding just right. To make sure you're confident before you order your custom embroidered caps, we’ve put together answers to the questions we hear most often from our Aussie clients.
Think of this as your quick-start guide to making smart decisions for your brand's new headwear.
What’s the Best File Format for My Logo?
For embroidery, a vector file is always the champion. Formats like .AI, .EPS, or .PDF are built with clean lines and curves, not pixels, which means we can scale your logo up or down without it getting blurry or jagged. This is absolutely crucial for the digitising process, where we translate your design into a stitch-perfect embroidery pattern.
While we can sometimes work with a high-resolution .JPG or .PNG, these often need a bit of extra design love to get them ready for stitching, which can add time and cost. Providing a vector file from the get-go ensures your embroidered logo looks as crisp and professional as possible.
Can You Match My Brand’s Pantone Colours?
Yes, we get incredibly close. We use massive thread charts from the world's best suppliers to find the perfect thread to match your specific Pantone (PMS) colours.
It's worth remembering that there's a slight difference between coloured ink on paper and dyed thread on fabric. But in our experience, the match is so precise that any tiny variation is virtually impossible to spot. Your brand integrity stays intact.
What Is 3D Puff Embroidery?
You've probably seen both types without even realising it. Standard (or flat) embroidery is the classic look, where the design is stitched directly onto the cap. It’s perfect for detailed logos and sharp text, giving a clean, professional finish.
3D puff embroidery, on the other hand, is all about making a statement. We place a special foam insert under the stitches, which makes your logo literally pop off the cap with a raised, three-dimensional effect. It works best for simpler, bolder designs like initials or chunky icons and gives your headwear a seriously premium feel.
Why Does Stitch Count Affect the Price?
It all comes down to time and materials. The stitch count is simply the total number of stitches needed to bring your design to life. A big, complex logo filled with colour will have a much higher stitch count than a simple text-based one.
Because the final cost is tied to how long the embroidery machine runs and how much thread is used, a higher stitch count means a higher price per cap. It’s one of the main factors that determines your final quote.
Ready to create standout headwear for your brand? The expert team at Simply Merchandise is here to guide you through every step, ensuring a flawless result. Explore our custom cap options today!


