

Ordering printed t shirts custom isn't just about slapping a logo on a basic tee. It's one of the smartest, most tangible marketing moves you can make, building genuine brand loyalty and a real sense of community. Whether they're for event giveaways, team uniforms, or customer merchandise, a great custom T-shirt transforms people into walking, talking advocates for your business.
More Than Just a Uniform: T-Shirts as a Branding Powerhouse
Think of a custom T-shirt as a mobile billboard. It generates countless brand impressions long after an event wraps up or a workday ends. For any Aussie business, this is a golden opportunity to launch a low-cost, high-impact marketing campaign that connects with people on a personal level. It's an incredibly versatile tool that can unify your team, create a buzz around an event, and build brand recognition in a way that feels completely natural.
A well-executed custom tee delivers some serious perks:
- A Real Morale Booster: A quality, well-designed shirt makes your team feel like they're part of something special.
- Walking, Talking Adverts: Every single person wearing your shirt becomes a brand ambassador out in the wild.
- Memorable Brand Recognition: Consistent, eye-catching apparel makes your brand stick in people's minds.
- Cost-Effective Marketing Punch: Compared to many other advertising channels, the return on investment for custom apparel is fantastic and its impact lasts for years.

The Real-World Impact for Australian Businesses
I've seen it time and time again. Picture a popular Melbourne laneway cafe that drops a limited-edition T-shirt design for its regulars. All of a sudden, a community rallies around the brand, with loyal customers proudly showing their support all over town. Or think about a Sydney tech startup launching a new app; custom tees for the launch event create an instant vibe, turning a simple gathering into an unforgettable brand moment.
The numbers back this up. The Australian custom T-shirt printing market was valued at USD 44.21 million in 2024 and is expected to rocket to USD 122.34 million by 2033. This incredible growth shows just how much businesses are leaning into custom apparel to create meaningful connections with their audience.
A great T-shirt doesn't just show off a logo; it tells a story and invites people to become part of it. It's a genuine investment in community, loyalty, and the kind of authentic advertising that money can't always buy.
Custom tees are a brilliant way to get your brand noticed. To really maximise their impact, it's worth exploring other strategies to improve brand awareness and make sure your message is hitting home. When you weave custom apparel into your marketing mix, you create a powerful, physical link to your customers.
Ready to see what's possible? Take a look through our huge collection of branded clothing.
Choosing the Right T-Shirt for a Perfect Print
Even the most brilliant design will fall flat on the wrong T-shirt. The success of your custom printed tees really hinges on the blank canvas you start with. Picking the right one means your final product won't just look professional, but will actually be something people want to wear—giving your brand the quality representation it deserves.
This decision is about more than just picking a colour. You need to think about how different materials, weights, and styles will work with your chosen printing method and, just as importantly, how they'll feel to the person wearing it. Getting this right from the start avoids that classic mistake: a shirt that looked great on the screen but feels cheap or fits terribly in real life.
Understanding Fabric Fundamentals
The fabric is easily the most critical part of the equation. It dictates the shirt's feel, how long it will last, and how well it takes the ink from a print. For most Aussie businesses, the choice usually boils down to three main options.
-
100% Cotton: You can't go wrong with classic cotton. It's soft, breathable, and provides a fantastic surface for both screen printing and Direct to Garment (DTG) printing. The ink absorbs beautifully, resulting in vibrant, crisp designs. It’s the perfect choice for retail merch or corporate giveaways where comfort is a top priority.
-
100% Polyester: This is your go-to for sportswear or active uniforms. Polyester is incredibly durable, resists shrinking and wrinkles, and its moisture-wicking properties are a lifesaver in the Aussie heat. It's also the only fabric that works for sublimation, a printing process that creates those amazing, all-over designs that will never crack or fade.
-
Poly-Cotton Blends: These blends (like a 50/50 or 60/40 mix) give you the best of both worlds. You get the softness of cotton paired with the strength and moisture-managing performance of polyester. They’re super versatile, hold their shape wash after wash, and often have that slightly heathered look that’s so popular right now.
The key takeaway here is to match the fabric to its purpose. A comfy cotton tee is perfect for a café uniform, whereas a breathable polyester shirt is a much better fit for a charity fun run or a landscaping team working outdoors.
Decoding Fabric Weight and T-Shirt Fit
Once you've landed on a fabric, you need to consider its weight and the style of fit. These two things define the garment's perceived quality and overall look.
Fabric weight is measured in GSM (Grams per Square Metre). A higher GSM doesn't automatically mean "better," but it does point to a heavier, more substantial shirt.
- Lightweight (130-150 GSM): These tees are airy with a soft drape, making them excellent for summer promotions or as a more fashion-forward option.
- Midweight (160-180 GSM): This is the sweet spot for most custom T-shirt orders. It strikes a great balance between durability, everyday comfort, and price.
- Heavyweight (190+ GSM): Thick, sturdy, and built to last. These are brilliant for workwear or for brands wanting to create a premium merchandise line.
The fit, of course, is all about how the shirt actually looks on someone. A poor fit can make even the sharpest design look amateur.
- Standard Fit: This is the classic, relaxed cut with a straight silhouette. It’s comfortable and a safe, crowd-pleasing choice for large orders where you need to fit a wide range of body types.
- Slim or Fashion Fit: A more modern, tailored style with a narrower chest and sleeves. This is a great pick for retail brands or staff uniforms aiming for a more contemporary image.
It can feel like there are a million options to sift through, but getting these basics down will help you choose with confidence. If you want to get a better sense of the different styles available, you can explore various clothing categories to see what might be the best match for your project.
Comparing Printing Methods: Screen vs. DTG and More
Choosing the right printing method is where the magic really happens. This decision is a big one, as it directly impacts the look, feel, durability, and, of course, the final cost of your custom t-shirts. It’s never about one method being universally "best," but finding the perfect match for your project.
Let's imagine you're planning a big conference in Sydney and need 500 identical tees for your attendees. In this case, screen printing is your undisputed champion. But what if you're a Brisbane startup wanting just 15 unique, full-colour shirts for your creative team? That’s where Direct-to-Garment (DTG) printing shines. Each technique has its time and place.
To figure out what’s right for you, start by thinking about your fabric and design needs. This will naturally guide you to the best printing solution.
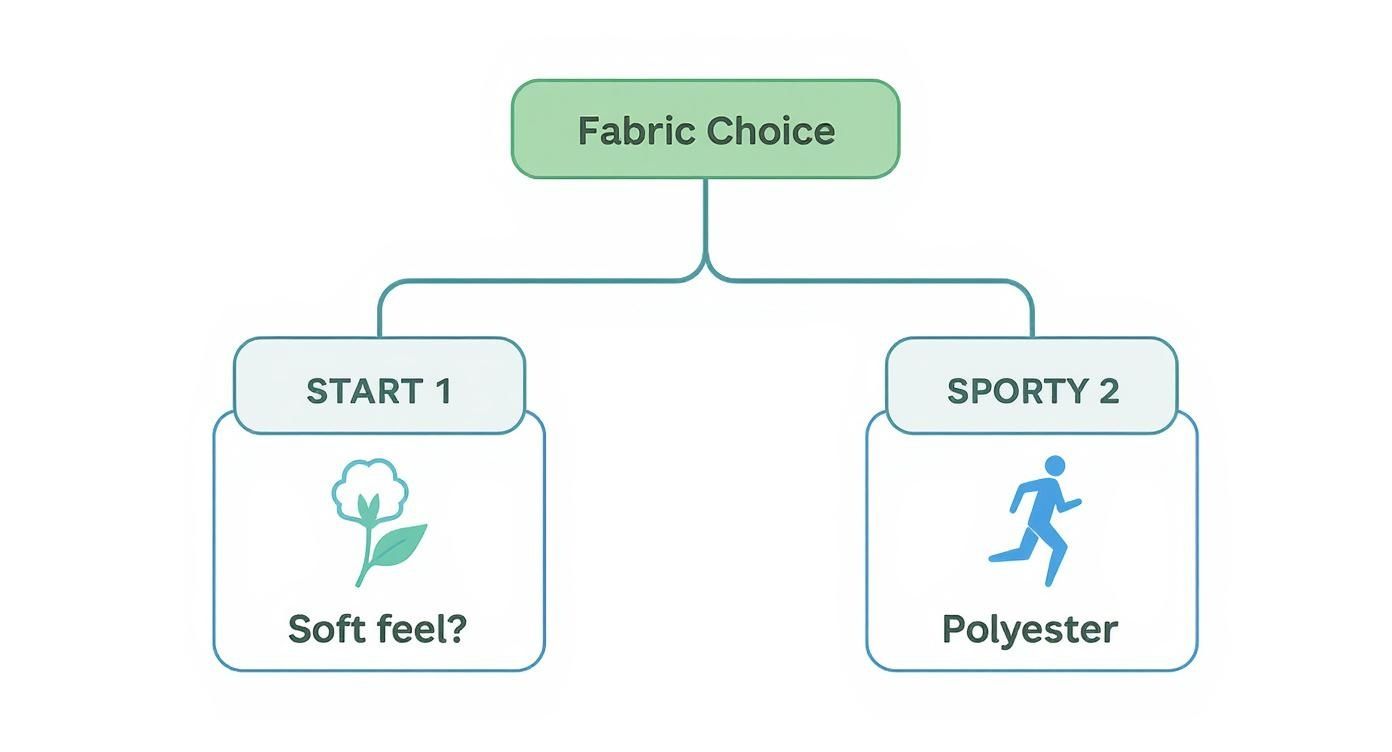
As the flowchart shows, connecting the shirt's purpose with the right fabric is your first step, and this choice heavily influences which printing methods are on the table.
The Powerhouse: Screen Printing
Screen printing is the traditional workhorse of the custom apparel world, and for good reason. The process involves pushing ink through a stencilled mesh screen directly onto the fabric, laying down one colour at a time. This tried-and-true method creates incredibly vibrant, long-lasting prints that have a slightly raised, tactile feel—a hallmark of professional quality.
The main thing to know about screen printing is the setup. Because a separate screen has to be created for each colour in your design, there are initial setup costs. This is precisely why it’s the king of cost-effectiveness for larger orders, typically 25 units or more. Once you hit that threshold, the price per shirt plummets, making it a no-brainer for big events, staff uniforms, or merchandise runs.
The Precision Player: Direct-to-Garment (DTG)
Think of DTG as a high-end inkjet printer, but for t-shirts. It sprays eco-friendly, water-based inks straight onto the garment, allowing it to reproduce millions of colours. This makes it the perfect choice for highly detailed or photorealistic designs, intricate illustrations, and artwork with subtle colour gradients.
What’s the best part? There are virtually no setup costs. This makes DTG brilliant for small batches or even one-off prints. If you need a handful of highly detailed tees for a small team or a limited-edition merchandise drop, DTG delivers stunning quality without forcing you into a large order.
The key difference really boils down to volume versus complexity. Screen printing is built for simple, bold designs in high volumes. DTG is the master of complex, full-colour artwork in low volumes.
A Quick Look at Other Printing Methods
Screen printing and DTG are the two heavyweights, but there are a couple of other techniques that are perfect for specific jobs.
-
Heat Transfers: This is where a design is printed onto special transfer paper and then applied to the t-shirt using heat and pressure. It's a fantastic option for putting individual names and numbers on team jerseys or for simple, one-colour logos on workwear. Modern digital transfers have come a long way and offer pretty solid durability.
-
Sublimation: This process is genuinely fascinating. Special ink is heated until it turns into a gas, which then permanently dyes the fabric's polyester fibres. The result is a vibrant, full-colour print that you can't even feel—it becomes part of the shirt itself. It will never crack, peel, or fade. The one catch? It only works on 100% polyester garments that are white or light-coloured.
To help you weigh the pros and cons, here’s a quick breakdown of the most common methods.
Printing Method Comparison for Your Custom T Shirts
| Printing Method | Best For | Feel on Fabric | Durability | Cost-Effectiveness |
|---|---|---|---|---|
| Screen Printing | Bulk orders (25+), simple designs with 1-4 solid colours, merchandise, uniforms. | Slightly raised, solid ink layer. | Excellent. Very long-lasting. | Extremely high for large runs. |
| Direct-to-Garment (DTG) | Small orders, photographic or highly detailed multi-colour designs, one-offs. | Soft, breathable, as ink soaks into the fabric. | Good. Best on 100% cotton. | High for small or single runs. |
| Heat Transfer | Individual names/numbers, simple logos on workwear, quick small jobs. | Smooth, plastic-like layer on top of the fabric. | Good. Modern transfers are quite resilient. | Moderate for small quantities. |
| Sublimation | Sportswear, all-over prints, vibrant full-colour designs on polyester. | Zero feel. The ink becomes part of the fabric. | Excellent. Permanent and will not fade. | High for small to medium runs. |
Choosing the right technique is a crucial step in getting the result you're after. For an interesting read on how different digital and traditional methods stack up, check out this article on DTF vs Screen Printing Graphic Tees.
To see how we apply these methods to bring our clients' ideas to life, have a look at the custom printing options we offer.
How to Prepare Your Artwork for a Flawless Print
You can have the most brilliant design for your printed t shirts custom, but if the artwork file isn't up to scratch, the final product will be a letdown. Getting your artwork print-ready isn't just a box-ticking exercise; it's the most crucial step to ensure your shirts look sharp, professional, and exactly how you imagined them.
Nailing this from the get-go saves everyone a world of headaches, from frustrating delays to the sting of paying for reprints. Think of it like this: your art file is the blueprint for your T-shirt. A blurry, incorrect blueprint leads to a wonky building. It’s the same deal here.
Vector vs Raster: Getting to Grips with The Big Two
First things first, you need to understand the fundamental difference between vector and raster files. They can look identical on your screen, but they act very differently when a printer needs to scale them for a T-shirt.
-
Vector Files (AI, EPS, PDF, SVG): For logos, text, and any kind of solid graphic, these are your absolute best bet. Vector images are built with mathematical paths, not pixels. That means you can blow them up to the size of a billboard or shrink them to a postage stamp, and they’ll stay perfectly crisp every single time. No fuzziness, no jagged edges.
-
Raster Files (JPG, PNG, TIFF, GIF): These are your go-to for photographs or complex, painterly designs. They’re made up of a grid of tiny squares called pixels. The catch? They have a fixed resolution. If you try to make a small raster image bigger, it just stretches the pixels, resulting in that dreaded blurry, pixelated look.
For most T-shirt jobs, particularly screen printing, a vector file is the undisputed champion. It’s what we printers hope to see every time we open a new job file.
Getting the Technical Details Spot On
Once you've sorted your file type, a few other specs are non-negotiable for a quality print. This is the checklist your designer should be running through, or that you can use yourself before you hit 'send'.
A major headache for the Australian custom printing industry is navigating operational hurdles and intellectual property issues with customer-supplied artwork. When your files are correct from the start, you help us avoid these snags and get a better result, faster. You can read more about the challenges and growth in the Australian custom printing market report.
Pro Tip: Always, always outline your fonts. This little trick converts the text in your design into a vector shape. It means the printer doesn't need to have your specific, fancy font installed on their system. It’s a tiny step that prevents massive printing errors.
Finally, double-check that your artwork is set to 300 DPI (dots per inch). This is the industry standard for high-quality printing. Anything less, and your print will likely look a bit soft or blurry, which really undermines all the effort you put into the design itself.
For a more detailed walkthrough, have a look at our simple guide to artwork submission for beginners.
From Quote to Delivery: The Final Steps
You’ve got your artwork sorted and you’re on the home stretch. Now it’s time to move from planning to production, getting a quote and seeing your printed t shirts custom order come to life. This is where all your preparation really pays off, ensuring the final leg of the journey is smooth and free of any last-minute surprises.
The quote you get isn't just an arbitrary number; it's a careful calculation based on everything you've decided so far. Understanding what goes into that final price means you can tweak your order to fit a budget without having to compromise on a great result.
What Goes Into Your Quote?
Every quote is built specifically for your job. The biggest cost drivers are the choices you’ve already made, but even small adjustments can have a surprising impact on the final price per shirt.
Here's what a printer is looking at when they price your order:
- The Garment Itself: A premium, heavyweight organic cotton tee will naturally cost more than a standard mid-weight poly-cotton blend.
- How Many You Need: This is the big one. The more shirts you order, the cheaper each one becomes. This is especially true for screen printing, where the initial setup costs are spread across the entire run.
- Number of Print Colours: With screen printing, every single colour in your design needs its own screen and a separate setup. A simple one-colour print is always going to be much more budget-friendly than a five-colour masterpiece.
- Print Locations: Want to add a logo to the sleeve or a custom tag print on the inner neck? Each extra print location adds to the labour and cost.
If you want to play around with these variables and see how they affect the numbers, a good first step is to use an instant print quote tool. It's a fantastic way to find that perfect balance between what you want and what your budget allows.
Don't Skip the Proof: Your Final Check
Before a single shirt is printed, you'll be sent a final proof for approval. This is your absolute last chance to catch an error, so treat it seriously. It’s the safety net that guarantees you get exactly what you're expecting.
Most of the time, this will be a digital mock-up—a computer-generated image showing your design on your chosen tee. Check it with a fine-tooth comb. Look for spelling mistakes, make sure the colours look right, and confirm the size and placement of the artwork are perfect.
For bigger or more intricate jobs, it’s often worth asking for a physical pre-production sample. Yes, it adds a little time and money to the process, but there’s nothing quite like holding the finished product in your hands for total peace of mind.
Approving your proof is the official green light. Once you sign off, the job is locked in and sent to production. Take your time and check every detail before you give the final okay.
Timelines, Delivery, and Making Sustainable Choices
A realistic turnaround time in the Australian market is typically 10 to 14 business days from the moment you approve the artwork, plus shipping time. Always get a firm date from your supplier and, if you’re working towards an event, build in a few buffer days. You’ll be glad you did.
It’s also great to see more businesses thinking about the environmental impact of their merchandise. The demand for sustainable printing in Australia is growing, and with it, the range of eco-friendly options. You can now easily find GOTS-certified organic cotton shirts and printers who use water-based inks, which have a much smaller environmental footprint. This shift is becoming a major driver in the local industry, as highlighted in recent Australian custom T-shirt printing market research.
Your Custom T-Shirt Questions, Answered
Finalising a big t-shirt order often brings up a few last-minute questions. It’s completely normal, and getting clear answers is the key to feeling confident about the final product you'll receive.
We get these queries from Aussie businesses all the time, so we’ve put together a quick guide to cover the most common ones – think of it as your final checklist before hitting 'go'.
What’s the Minimum Number of Shirts I Can Order?
This is probably the number one question we hear, and the honest answer is: it depends entirely on how you want them printed.
-
Screen Printing: Because this method involves a pretty intensive setup for each colour in your design, most print shops will have a minimum order quantity (MOQ) of around 20-25 shirts. It's designed for bulk orders, and the price per shirt gets much better the more you order.
-
Direct-to-Garment (DTG): This is a digital process, a bit like a giant inkjet printer for fabric. There's virtually no setup time, which makes it perfect for small runs or even one-off samples. You can often order a single shirt, but it’s most cost-effective for smaller batches, say 5 to 10 at a time.
How Can I Guarantee My Brand Colours Will Be Accurate?
What you see on your computer screen rarely translates perfectly onto fabric. Monitors are backlit and fabrics absorb ink, so colours can appear different.
To get a perfect match, the gold standard is providing your printer with Pantone (PMS) colour codes. This is a universal colour-matching system that takes all the guesswork out of the equation. Your printer will mix the inks to match that exact PMS reference, ensuring your brand's specific shade of blue is your shade of blue.
Pro Tip: Using PMS codes is the single best thing you can do for brand consistency. It means your t-shirts, caps, and tote bags will all have the exact same colours, every single time. It's a non-negotiable for serious brand management.
How Should We Look After Our New Printed T-Shirts?
You want those prints to look sharp for as long as possible, right? A little bit of care goes a long way. Share these simple instructions with your team or customers:
- Turn it inside out: Always wash the shirt inside out. This simple trick protects the print from rubbing against other clothes in the wash.
- Go cold: Wash in cold water on a gentle cycle. Hot water is the enemy of printed tees and can cause fading or cracking over time.
- Air dry if you can: The heat from a dryer is rough on prints. Hanging them out to dry is best, but if you're in a hurry, use the lowest heat setting possible.
The custom apparel scene in Australia is massive, covering everything from corporate uniforms to personal projects across every state. Getting a handle on these details helps you make smarter buying decisions. You can dive deeper into the Australian t-shirt printing market segments on credenceresearch.com.
Ready to create some amazing custom gear that people will actually want to wear? The expert team at Simply Merchandise is here to guide you through the whole process, from design to delivery. Explore our range and get your instant quote today!


