
Access Denied
IMPORTANT! If you’re a store owner, please make sure you have Customer accounts enabled in your Store Admin, as you have customer based locks set up with EasyLockdown app. Enable Customer Accounts

A Guide to Custom Tote Bag Printing
Posted By Matthew Malios
on
Tote bag printing is a fantastic way to turn a simple, everyday item into a walking advertisement, a personal style statement, or a keepsake from a special event. It’s all about taking a blank tote and applying your unique design, logo, or message, creating something that’s both practical and eye-catching.
This guide will break down everything you need to know to get it right.
Why Custom Tote Bags Are Such a Good Idea
Printed tote bags are a go-to for Aussie brands, events, and creatives for a reason. They're more than just a way to carry things; they're a mobile billboard, a nod to sustainability, and a real-world connection with your audience. A well-designed tote gets your brand seen again and again, long after it leaves your hands.
Think of this as your start-to-finish playbook for creating the perfect printed tote. We’ll cover the whole journey, from that first spark of an idea to a finished product people will actually love to use. Getting these early decisions right is the key to a successful project.
A Seriously Effective Marketing Tool
A custom tote bag gives your brand repeated, real-world exposure. Unlike a fleeting digital ad, a tote bag gets carried around in public—at the local shops, the gym, or on the train—racking up organic impressions for months or even years. This kind of consistent visibility is gold for building brand recognition and loyalty.
The move towards reusable bags isn't just a passing fad; it's a major shift in how we shop and live here in Australia. With single-use plastics being phased out, the demand for sustainable options has skyrocketed. In fact, the Australian retail bags market is tipped to hit USD 1.34 billion by 2030. Even more telling is that natural fabric bags, like our beloved cotton totes, have seen a 60% jump in use over the last five years. You can dive deeper into these trends in Mordor Intelligence's report on the Australian retail bags market.
A custom tote bag is one of the most practical pieces of merchandise you can create. It serves a genuine purpose in daily life, ensuring your brand stays relevant and visible to both the user and everyone they encounter.
Key Decisions in the Printing Process
To make sure your final design really pops, there are a few important things to figure out upfront. These choices will shape the quality, cost, and overall vibe of your totes.
Here’s what you’ll need to think about:
- Choosing the Right Printing Technique: Is screen printing the best fit for your bold, simple logo, or do you need digital printing for a detailed, full-colour photo?
- Selecting the Best Fabric: Will your design look best on classic cotton, heavy-duty canvas, or earthy jute?
- Preparing Your Artwork Correctly: Is your design file a high-resolution format that's ready for a crisp, clean print?
Don't worry, navigating these options is easier than it seems. For a wider look at how these choices come into play across different products, have a browse through our overview of promotional bags. It’s a great way to see the bigger picture of creating branded gear that works.
Finding the Right Printing Method for Your Design
Picking the right printing method for your tote bags is one of the most critical decisions you'll make. It’s a choice that directly impacts the look, the feel, and the final cost of each bag. Every technique has its own strengths, making each one a perfect fit for different kinds of artwork, order sizes, and budgets.
To get a handle on it, let's use a few simple analogies. Screen printing is a bit like using a stencil, digital printing is like a high-tech inkjet printer for fabric, and heat transfer is essentially a professional-grade iron-on. Getting your head around these differences is the key to matching your project with the perfect process.
This decision tree offers a quick visual guide, helping you line up your project needs with the ideal printing technique.

As you can see, what you plan to do with the bags—whether it's for brand promotion, a one-off event, or retail—really helps point you in the right direction.
To help you compare the main options at a glance, here’s a quick breakdown of the top three methods.
Tote Bag Printing Methods Comparison
| Feature | Screen Printing | Digital Printing (DTG) | Heat Transfer Vinyl (HTV) |
|---|---|---|---|
| Best For | Large bulk orders (25+) with simple, bold graphics (1-4 colours). | Complex, full-colour designs like photos or detailed illustrations. Small to medium runs. | Simple text, logos, and custom names/numbers. Small batches and one-offs. |
| Look & Feel | Vibrant, slightly raised ink that sits on the fabric. Extremely durable. | Soft feel, as the ink soaks into the fabric. Matte finish. | Crisp, opaque, and vinyl-like finish. Can feel slightly stiff. |
| Cost-Effectiveness | Highly cost-effective for large quantities. The price per bag drops significantly as the order size increases. | Good for small orders as there are no setup costs. Can be expensive for large runs. | Affordable for small, customised jobs. Becomes labour-intensive and costly for large orders. |
| Durability | Excellent. One of the longest-lasting print methods. | Good, but can fade over time with repeated washing. | Very durable when applied correctly, but can crack or peel with heavy use or improper care. |
| Special Finishes | Limited, but can include puff ink or metallics. | None, focuses on accurate colour reproduction. | Huge variety, including glitter, metallic, flocked, and glow-in-the-dark. |
Each method has its place, and knowing the pros and cons makes it much easier to decide which one will bring your design to life most effectively.
Screen Printing: The Bulk Order Champion
Screen printing is a classic for a reason. This tried-and-true method works by pushing ink through a fine mesh screen directly onto the fabric. A new screen has to be created for every single colour in your design, which is why it’s the perfect candidate for artwork with a limited colour palette.
It’s a bit like creating a very detailed stencil. The result is an incredibly vibrant and durable print that really stands the test of time. Because of the initial setup required to make the screens, screen printing shines on larger orders—we're talking 25 bags or more. The cost per bag drops dramatically as the quantity goes up, making it the undeniable go-to for events, corporate giveaways, and big promotional campaigns.
Screen printing is ideal when you have a bold, graphic design with one to four solid colours and you need a large quantity of totes. It delivers exceptional quality and durability at a great price for bulk orders.
Digital Printing (DTG): For Full-Colour Detail
Digital printing, often called Direct-to-Garment (DTG), functions a lot like the printer on your desk, but it’s built for fabric. It uses specialised water-based inks that absorb right into the material, becoming part of the tote bag itself. This makes it the undisputed champion for complex, multi-coloured designs—think photographs, detailed illustrations, or anything with colour gradients.
There are no screens to set up, so the process is much quicker to get started. This makes DTG a brilliant choice for small runs or even one-of-a-kind custom bags. It excels at capturing tiny details and a massive spectrum of colours with impressive accuracy. The final print feels soft because the ink is in the fabric, not sitting on top of it. For anyone curious about the nitty-gritty, understanding pigment vs. dye-based inks is a great way to see how ink chemistry really affects print quality.
Heat Transfer Vinyl (HTV): For Bold and Customised Graphics
With Heat Transfer Vinyl (HTV), your design is first cut from a sheet of coloured vinyl. Then, using a commercial heat press, it’s fused onto the tote bag. This method is absolutely perfect for simple shapes, text, and logos that need a clean, solid, and opaque finish.
HTV really comes into its own for personalisation. Need to add individual names or numbers for a sports team or event? This is the way to do it. It also opens up a whole world of unique finishes like glitter, metallic, and even glow-in-the-dark, which can make a simple design pop. While it can get a bit slow for big orders, it’s a fantastic and affordable solution for small batches and highly customised projects. Taking a look at our detailed breakdown of custom printing options can give you even more clarity on which technique is the right fit for you.
How to Select the Perfect Bag Material
The material of your tote bag is much more than just fabric—it’s the canvas for your artwork. Picking the right one is just as crucial as the design itself. It's not just about looks or cost; the material directly impacts how your final print will turn out, making sure your design comes to life exactly as you imagined.
Think of it like painting. You wouldn't use watercolours on a rough, unprimed bit of wood if you wanted fine detail. For that, you’d want a smooth canvas. The same logic applies here. The fabric's texture, weave, and even its colour play a huge part in creating the final masterpiece.
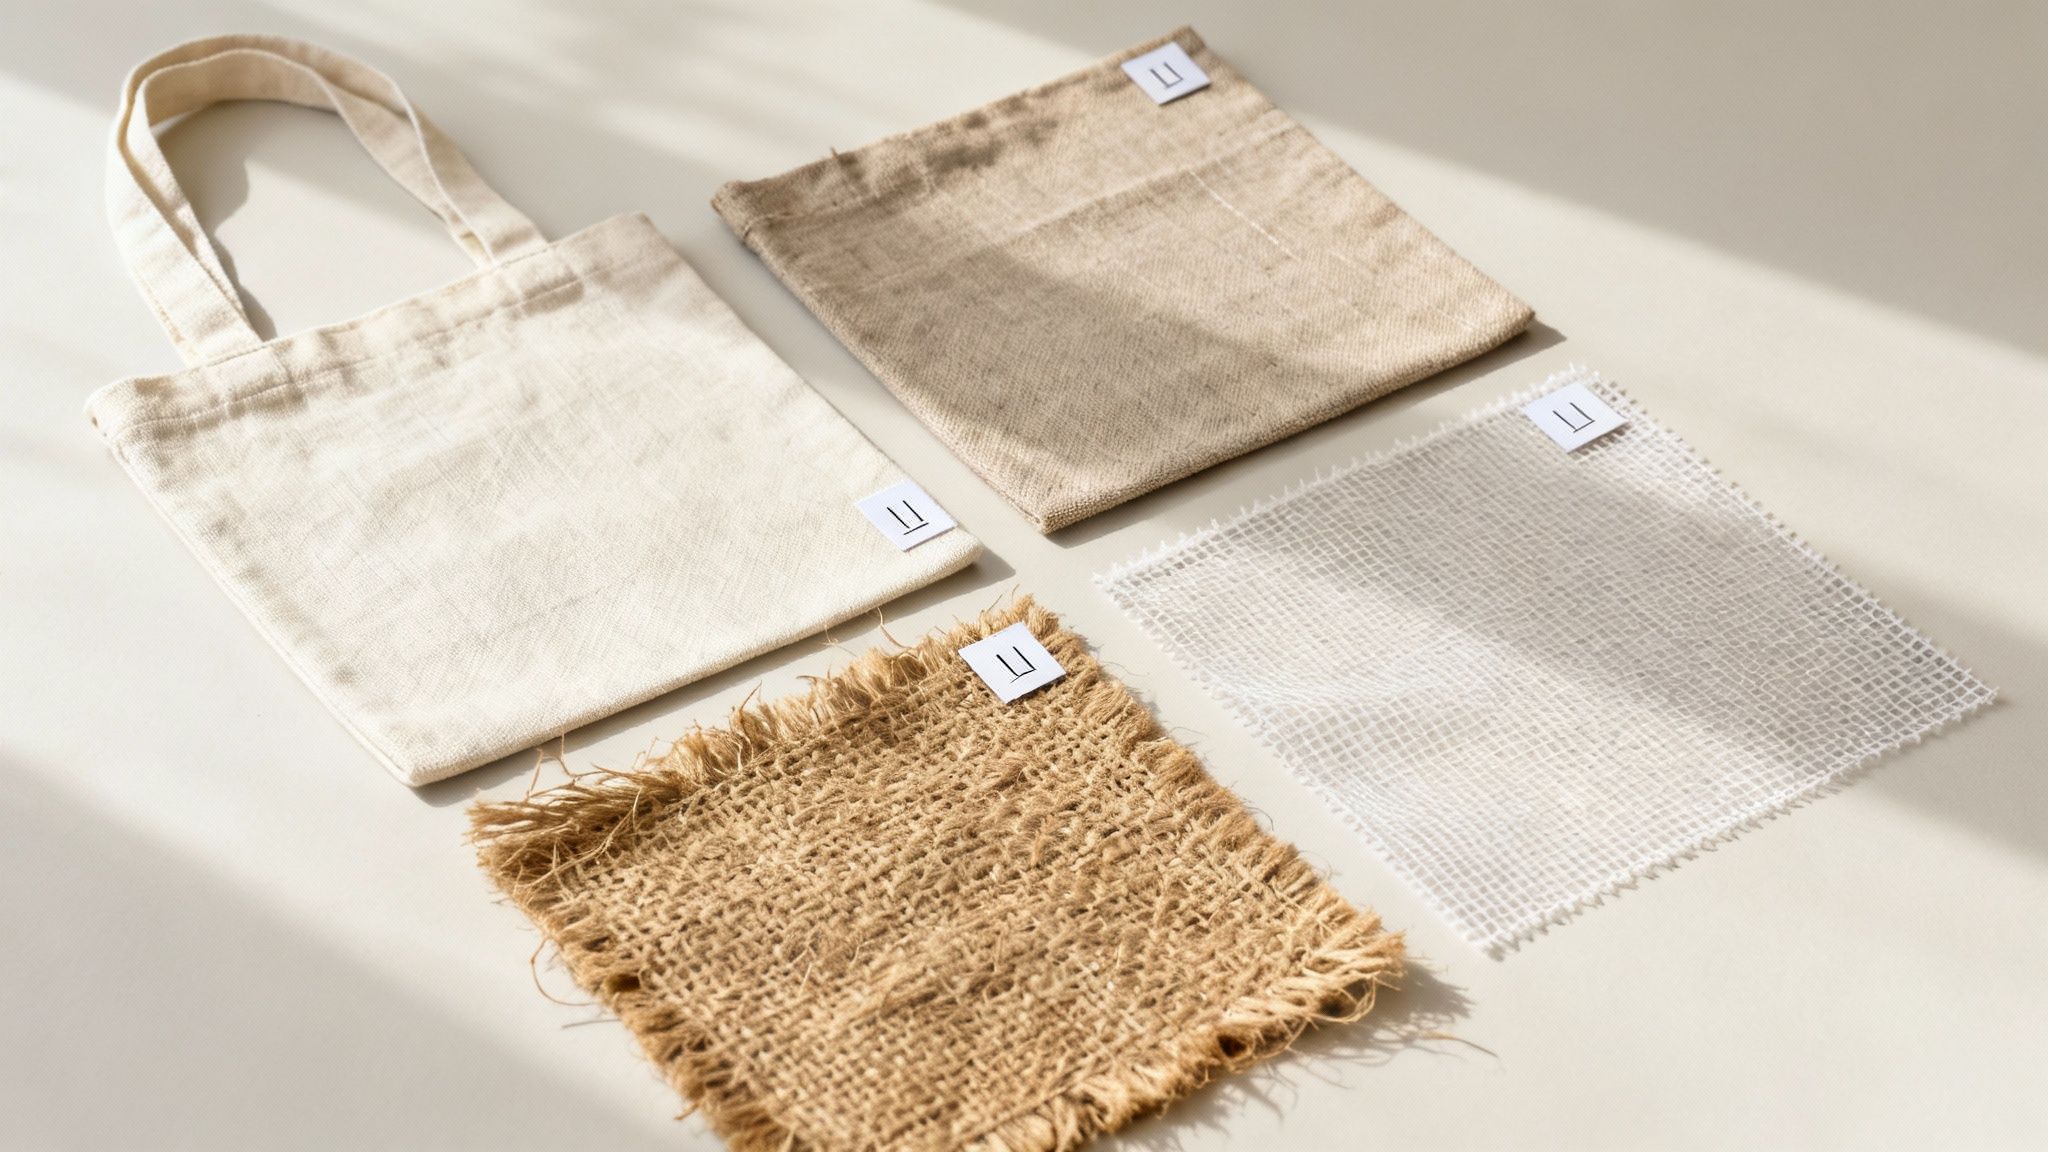
Classic Cotton: The Versatile Favourite
Cotton is, without a doubt, the most popular choice for custom totes, and it's easy to see why. It’s light, easy on the wallet, and its soft, smooth surface is a fantastic base for printing. The fine, tight weave is perfect for capturing those smaller, more intricate designs.
This makes cotton an ideal match for digital (DTG) printing. The ink absorbs beautifully into the natural fibres, leaving a soft, breathable finish that can capture every little detail of a full-colour photo or a complex illustration. It's your go-to for that classic, comfy tote bag feel.
Durable Canvas: The Heavy-Duty Workhorse
When you need a bag that can stand up to some serious daily use, canvas is your champion. Think of it as cotton's tougher, more rugged older sibling. It offers far greater strength and structure, and its thicker, coarser texture gives it a distinctly premium feel.
This sturdiness makes canvas a brilliant partner for screen printing. The thick, vibrant inks used in this method sit right on top of the fabric, creating a durable, slightly raised print that really pops and won't get lost in the heavier texture. It’s the perfect choice for bold logos and graphic designs built to last.
It's no surprise that tote bags are such a fixture in the Australian market. They're a massive part of the bags and containers sector, which hit a value of USD 1,713.4 million in 2024 and is still on the rise. This growth is really being pushed by a big consumer shift towards reusable and promotional gear, especially in cities like Sydney and Melbourne. You can dive deeper into these trends with market insights from Grand View Research.
Jute and Non-Woven Polypropylene: Other Great Options
Cotton and canvas might be the headliners, but other materials bring their own unique advantages to the table, depending on what you're trying to achieve.
- Jute: For that earthy, rustic vibe, you can't beat jute. This natural fibre has a coarse, open weave that gives it a wonderfully organic feel. It’s best for simple, bold designs, as fine details tend to get a bit lost in its rugged texture.
- Non-Woven Polypropylene (NWPP): If you're on a tight budget or need a massive quantity for a giveaway, NWPP is your answer. This plastic-based fabric is water-resistant, super light, and incredibly cost-effective for large orders. It screen prints well with simple, one-colour logos.
Getting your head around how each material plays with different inks and printing methods is the real secret. Smooth cotton lets water-based inks soak in for a soft-to-the-touch finish, while the tough surface of jute is a much better home for the thick, opaque finish of plastisol inks. Aligning your fabric choice with your design's needs is the final step in creating a bag that truly works.
To see how these material choices can tie into a bigger sustainability picture, check out our range of eco-friendly promotional products.
Preparing Your Artwork for a Flawless Print
A brilliant design concept can fall flat if it's backed by a poor-quality artwork file. Getting your design ready for the printer is the final, and most crucial, step to make sure what you see on screen translates perfectly onto fabric. Think of it as the pre-flight check before your tote bag project takes off.
Nailing these technical details is what guarantees a professional, high-quality result. It helps you dodge common pitfalls like blurry images, mismatched colours, or designs that just don't pop the way you imagined. This groundwork is what separates a decent tote from a truly exceptional one.
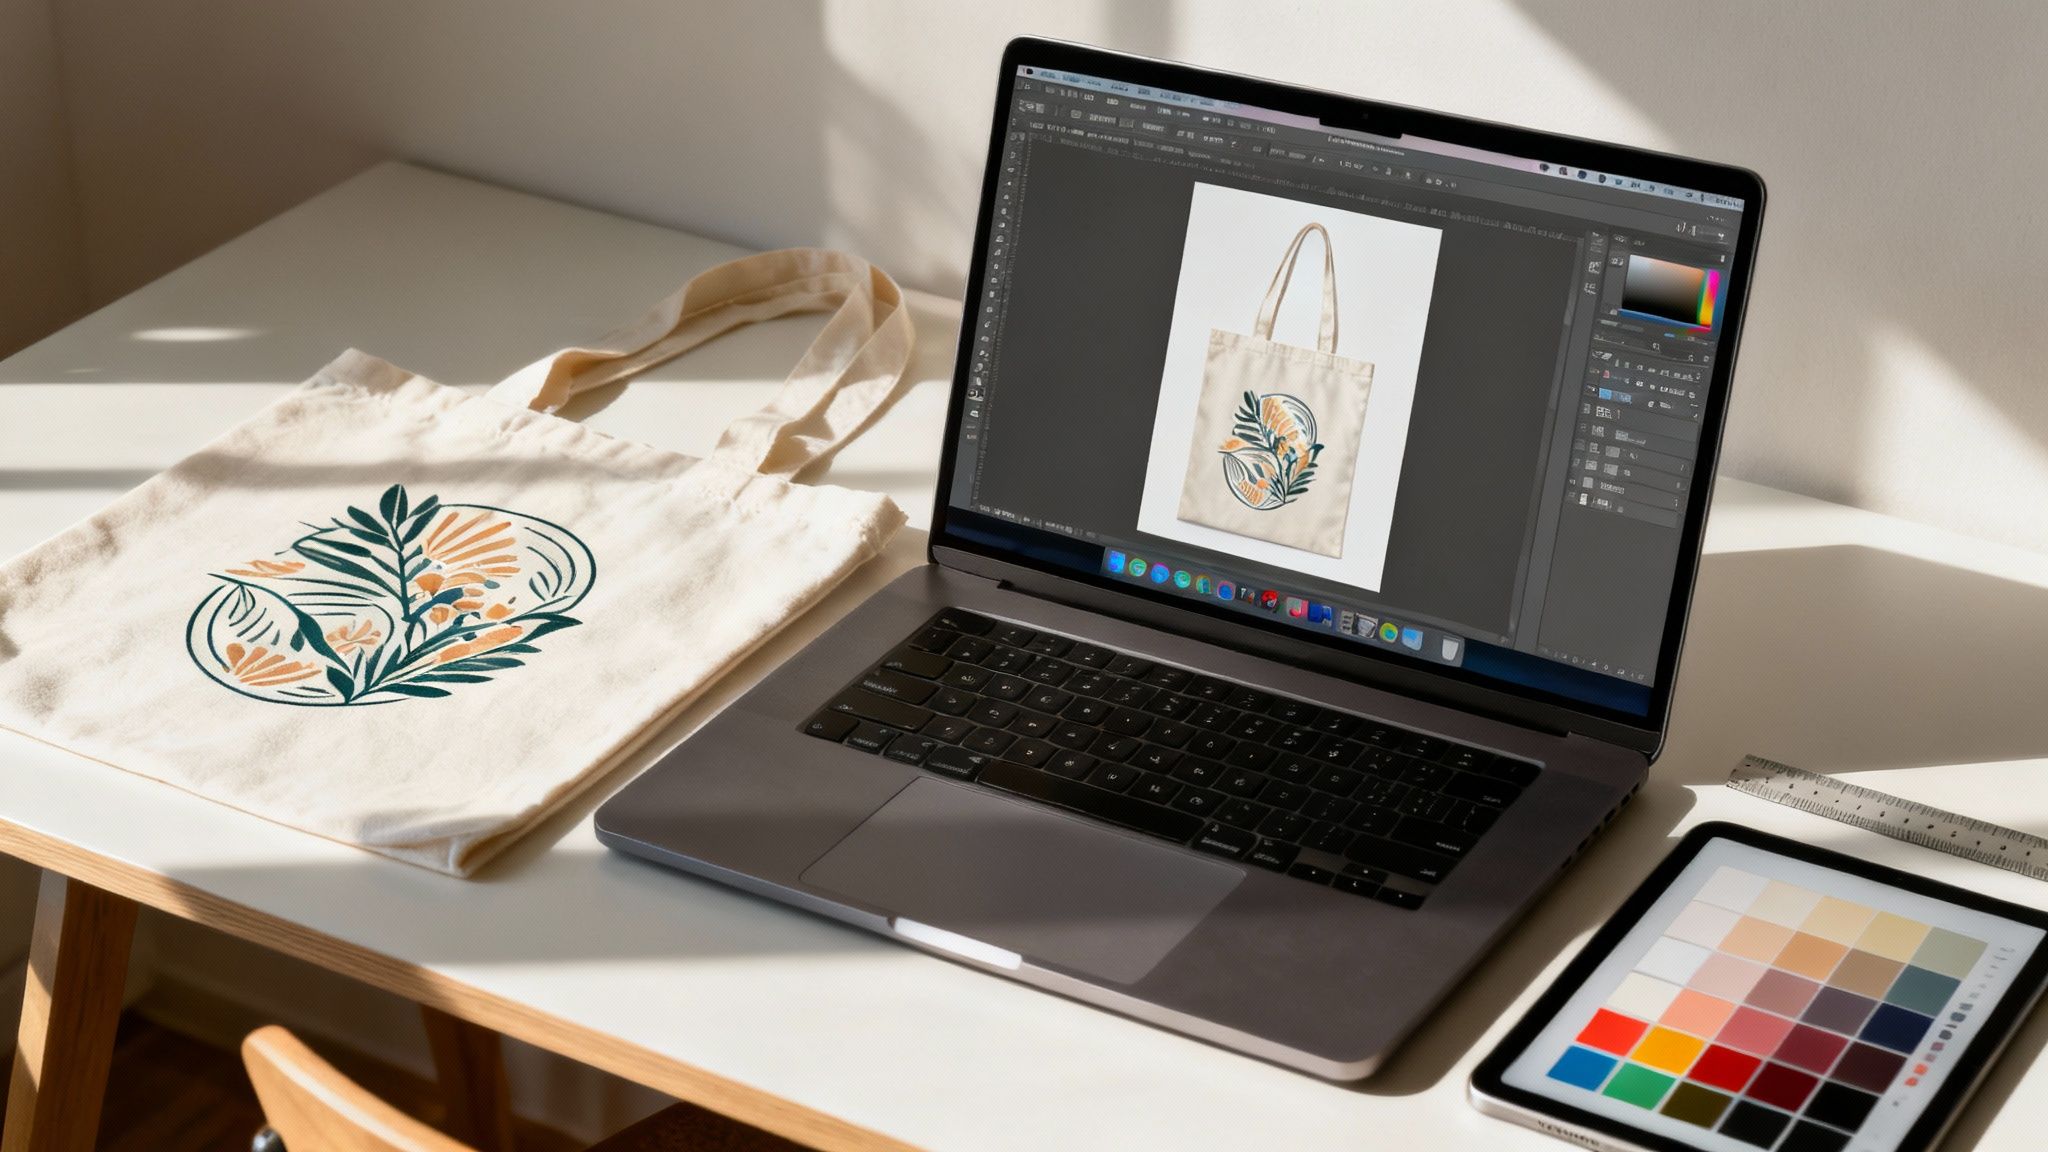
Vector vs Raster: The File Format Showdown
First things first, let's talk file types. Understanding the difference between vector and raster files is probably the most important piece of the puzzle. They're built differently, and choosing the wrong one is a recipe for a disappointing print.
-
Vector Files (AI, EPS, PDF, SVG): These are the gold standard for most printing. Instead of pixels, vectors are made from mathematical equations that form lines and shapes. The magic here is that you can scale a vector image to any size—from a tiny logo on a pen to a massive billboard—and it will never lose quality. It stays perfectly sharp.
-
Raster Files (JPG, PNG, TIFF): These are your typical image files, made up of a grid of tiny coloured squares called pixels. They're great for photos and complex, detailed images. The catch? When you try to make a raster image bigger, you're just stretching those pixels, which leads to that dreaded blurry, pixelated look.
For tote bag printing, always use a vector file for logos, text, and graphic illustrations. This ensures your design is perfectly crisp, no matter the size. If your design includes a photograph, you'll need a high-resolution raster file to get the job done right.
Resolution and Colour: The Technical Essentials
Once you’ve got the right file type, there are two other critical specs to check: resolution and colour mode. These settings have a direct impact on how sharp and vibrant your final print will be.
Getting these details right from the start saves a lot of headaches (and money on reprints). To ensure your designs translate perfectly onto tote bags, following a comprehensive checklist for creating print-ready files is a great way to cover all your bases.
Why 300 DPI Is the Magic Number
For any raster images in your design, resolution is measured in Dots Per Inch (DPI). This number basically tells the printer how many tiny dots of ink to put down in a one-inch line. For a high-quality, professional print, 300 DPI is the industry standard.
If you use a low-resolution image, like one you’ve pulled from a website (often just 72 DPI), it will look fuzzy and pixelated when printed. Always start your design on a 300 DPI canvas or make sure your photos are high-resolution to begin with.
CMYK vs Pantone Colours
The colour mode of your file dictates how colours are created on the final product.
-
CMYK (Cyan, Magenta, Yellow, Key/Black): This is the standard for full-colour printing, like you'd see with DTG. It works by mixing these four ink colours to create a whole spectrum of hues, much like a desktop printer.
-
Pantone (PMS): The Pantone Matching System is different. It uses specific, pre-mixed "spot" colours. This is the go-to for screen printing when you need an exact colour match—perfect for brands who need their signature red to be the exact same shade, every single time.
Creative Tips for an Eye-Catching Design
Beyond the technical stuff, a few design pointers can take your tote bag from good to genuinely great.
-
Maximise the Printable Area: Pay attention to the bag's construction. Keep your design away from the seams, handles, and gussets to make sure it doesn’t get distorted or cut off. Stick to the main flat panel.
-
Choose Legible Fonts: You want your message to be readable, even from a distance. Go for clear, bold fonts and try to avoid super thin or fussy scripts that might get lost in the texture of the fabric.
-
Use Strong Colour Contrast: A design that contrasts sharply with the bag's colour will always have more impact. Think light-coloured ink on a dark bag, or vice versa. It’s a simple trick that makes your design pop, especially for the single-colour prints common on promotional totes.
For a bit more guidance, our simple guide on artwork submission tips for beginners can walk you through the final steps before you send your file off to print.
What Goes Into the Price of a Custom Tote Bag?
Figuring out the cost of custom tote bag printing isn't some dark art. It’s actually pretty straightforward once you understand what's moving the needle on the final price. Knowing how these different elements work together helps you make smart choices to get the best bag for your budget.
Think of it like building a custom car. You have the base model, but every upgrade—from the paint colour to the engine—adds to the final sticker price. It's the same with totes. The plain bag is your starting point, and everything you add from there influences what you'll pay per bag.
The Four Main Cost Drivers
There are a few key things that will always shape the final quote for your printed totes. Get your head around these four, and you'll be able to budget like a pro and avoid any nasty surprises.
-
The Bag Itself: This is your foundation. A heavy-duty, organic cotton canvas tote is naturally going to have a higher base price than a standard, lightweight non-woven polypropylene bag. The material, weight, and construction are the first costs to consider.
-
Your Printing Method: As we've touched on, screen printing has some upfront setup involved, making it a bit pricey for very small runs but incredibly cost-effective for big orders. On the flip side, digital printing has almost no setup costs, making it perfect for small batches with full-colour designs, though it can get less economical as your quantity climbs.
-
How Complex is Your Design?: This one's a biggie, especially for screen printing. A new screen has to be created for every single colour in your artwork. That means a clean, one-colour logo is going to be significantly cheaper than a five-colour masterpiece. There's a reason around 91% of promotional prints are just a single colour—it’s the most budget-friendly option!
-
How Many Bags Do You Need?: This is where you really start to see some savings. The more bags you order, the lower your price per bag becomes. Why? Because those initial setup costs get spread out over a much larger number of units, bringing the individual price right down for orders of 100, 500, or more.
Pro Tip: The single biggest way to lower your per-unit cost is to increase your order size. If you know you'll need more bags later, ordering them all at once is almost always cheaper than placing several smaller orders over time.
To give you a clearer picture, let's break down the variables that determine the final price of your custom printed tote bags. This table should help you see how each choice impacts your budget.
Key Factors Influencing Tote Bag Printing Costs
| Cost Factor | Description | Impact on Price |
|---|---|---|
| Material Quality | The type of fabric used (e.g., standard cotton, organic canvas, jute, non-woven polypropylene). | Higher quality, heavier, or eco-friendly materials increase the base cost per bag. |
| Printing Method | The technology used to apply the design (e.g., screen printing, digital printing (DTG), heat transfer). | Screen printing is cost-effective for bulk orders with few colours. Digital is better for small runs with complex, multi-colour designs. |
| Number of Colours | The total count of distinct colours in your artwork. | For screen printing, each additional colour requires a new screen, significantly increasing setup costs. |
| Print Locations | Where the design is printed (e.g., one side, both sides, on the gusset). | Each additional print location is treated like a separate print job, adding to the overall cost. |
| Order Quantity | The total number of bags you are ordering. | Price per unit drops dramatically as the quantity increases due to economies of scale. |
| Turnaround Time | How quickly you need the bags delivered. | Standard production times are cheapest. Rush orders often incur extra fees to prioritise your job. |
Ultimately, balancing these factors is key. A simple one-colour print on a standard bag will always be the most economical choice, while a full-colour photo printed on both sides of a premium organic canvas bag will be at the higher end of the price spectrum.
Putting It All Together: A Real-World Example
Let's make this tangible. Say you're ordering 100 cotton tote bags for a community event.
If you go with a simple, one-colour logo using screen printing, the initial setup might feel a bit steep, but the cost per bag will be quite reasonable. You might end up paying around $5 per bag.
Now, let's say you want to print a full-colour photograph on those same 100 bags. Digital printing is your only real option here. You'll skip the screen setup fees, but the ink and machine time are more expensive for each individual bag. This could push the price up to around $9 per bag.
This shows the trade-off perfectly. Need 20 bags with a vibrant, detailed design? Digital printing is your best friend. But if you need 500 bags with a simple logo, screen printing offers value that's hard to beat. Getting a grip on this relationship between quantity, complexity, and printing method is the secret to mastering your tote bag printing budget.
Bringing Your Tote Bags to Life: The Ordering Process
Alright, you've got your design nailed down and a good idea of the materials you want. Now for the exciting part: turning that vision into a real, tangible tote bag. The ordering process isn't complicated, but knowing the steps helps everything run smoothly and ensures you get exactly what you're picturing.
Think of it like building with LEGOs – you follow a few simple steps in order, and at the end, you have a finished creation. Let's walk through it.
Kicking Things Off: Quotes and Artwork
The first phase is all about getting on the same page with your printer about the scope and cost of your project. Clear communication here prevents surprises later.
-
Get a Quote: First things first, you need to know what it's going to cost. The price depends on the bag you choose, how many colours are in your design, the print method, and of course, how many you're ordering. For a quick estimate, tools like our instant print quote are great for playing with the numbers and seeing how different choices impact the bottom line.
-
Send Your Artwork: Once you’re happy with the quote, it’s time to send over your design file. To get a crisp, clean print, you’ll need to provide a high-resolution vector file – think formats like AI, EPS, or PDF.
Getting these first two steps right lays a solid foundation for the rest of the project.
From Proof to Production Line
With your artwork in hand, we move from the digital world to the physical one. This is where your design starts to become a real product.
The most important checkpoint here is the digital proof approval. We'll send you a digital mock-up that shows exactly how your design will look on the bag – size, position, colours, everything.
Pay close attention to the proof! This is your final chance to spot a typo, tweak the placement, or make any last-minute changes before we hit "print." Check every single detail.
Once you give the thumbs-up on the proof, your job officially enters the production queue. From there, we handle the technical side of things – preparing screens, mixing inks, printing, and curing. After a final quality check, we'll carefully pack your brand new tote bags and ship them straight to your door. We'll give you a clear timeline and keep you in the loop, so you know exactly when to expect your delivery.
Common Questions About Tote Bag Printing
Even after you've nailed down your design and chosen a material, a few practical questions almost always come up before you hit 'order'. Getting these sorted will give you the confidence that the whole process will run smoothly, without any nasty surprises.
Think of this as your final checklist. We'll run through the most common questions we get from customers, making sure you’re ready to bring your custom tote bags to life.
What’s the Minimum Order for Custom Tote Bags?
This is easily one of the first questions people ask, and the answer really comes down to the printing method you’ve chosen. There’s no single "magic number" because each technique has its own setup process.
-
Screen Printing: This method is all about creating physical screens, one for each colour in your design. Because of that initial setup, it only makes sense for larger runs. Most printers will have a minimum order quantity (MOQ) of around 25 to 50 bags to make it worth everyone's while.
-
Digital (DTG) & Heat Transfer (HTV): These digital methods are a different story. With almost zero setup cost, they’re incredibly flexible. This makes them perfect for small batches, prototypes, or even a single personalised gift. You can often order as few as one bag.
Knowing this difference is crucial for matching the size of your project to the right technology.
How Long Will the Print on My Tote Bag Last?
You want your design to look great for years, not just a few weeks. The good news is that with a bit of care, a professionally printed tote can last a very long time. It all depends on the printing technique and how you look after the bag.
Professionally applied screen prints and DTG prints are built to last. The ink is either cured at scorching temperatures or chemically bonded directly into the fabric fibres. To get the most life out of any printed tote, always wash it inside out on a cool, gentle cycle and skip the tumble dryer. Heat transfer vinyl is also quite durable but can be more prone to cracking over time if it's not washed carefully.
A well-cared-for custom tote is designed for the long haul. The goal is to create something people will use again and again, and modern printing methods are more than up to the task.
Can I Print a Photograph on a Tote Bag?
Absolutely! Printing a photo is a brilliant way to make a tote bag that’s completely unique, and for this, Digital Printing (DTG) is your go-to method.
Think of it like a high-end inkjet printer, but for fabric. DTG can reproduce the millions of colours and subtle gradients in a photograph with incredible accuracy. The result is a soft, vibrant, and highly detailed image that feels like it's part of the material itself.
Screen printing, on the other hand, just isn’t built for photos. It works by applying solid layers of colour one at a time, so it can’t handle the complex shading and fine detail of a photograph. For any design featuring a photo, DTG is the undeniable champion.
Ready to create tote bags that get your brand noticed? The expert team at Simply Merchandise is here to help you through every step, from artwork advice to final delivery. Explore our huge range of customisable tote bags and get started today
Related Posts

Running a Winning Water Bottle Promo
Discover how to run a successful water bottle promo. This guide covers material selection, branding, and strategies to maximize your...
Read More
A Guide to Embroidery on Work Shirts
Discover how to get professional embroidery on work shirts. This guide covers artwork, thread choice, logo placement, and care for...
Read MoreInvalid password
Enter

